How to Paint a Kitchen Tile Backsplash
Wondering how to paint tile? If you’re looking for an easy and budget-friendly way to update your home, painting tile is such an easy way to do so! Learn how to paint a kitchen tile backsplash, with steps that can be applied to painting tile in any room.
When we bought our home 2 years ago, I loved the layout of our open floorplan. Our kitchen was big and flowed right into our living room, which meant that I could easily prep and cook meals while also keeping an eye on our littles.
The only thing I didn’t like was the color scheme and how dated it felt. Our kitchen was still completely builder grade, with composite countertops that always looked dirty because they were tinged yellow.
While the cabinets were in great shape, the dark color wasn’t really my thing. Paired with the beige tile backsplash, our kitchen always looked dark and shady no matter what time of day!
I knew that I wanted to update our kitchen, but I didn’t want to complete gut it and spend the big bucks to start from scratch. After talking through options with my husband, we decided on replacing the kitchen countertops, backsplash and painting the cabinets.
We actually did a new kitchen tile backsplash in our old home, but our kitchen was MUCH tinier. We decided for this project we wanted to hire a professional because there was no way either of us had the time to take on a big project like that.
However, after talking to a contractor, we found out that with the way our backsplash was installed we would most likely need to replace all of the drywall if it was removed!
Pair that expense with the money that it would cost for a professional to do the entire new backsplash and it was way more than we wanted to spend.
With how many other home projects we wanted to be able to do, we were back to the drawing board. I knew that just replacing the countertops wasn’t going to give me the kitchen makeover that I truly wanted. After doing some research, I learned that you could actually paint a kitchen tile backsplash quickly and easily, with beautiful results!
When I first suggested painting our kitchen tile backsplash, my husband was far from on board. His biggest concern was how it would hold up in an area that is used a ton like our kitchen is. He was also worried that it just plain wouldn’t look good.
After doing a bunch of research, I decided to just go for it!
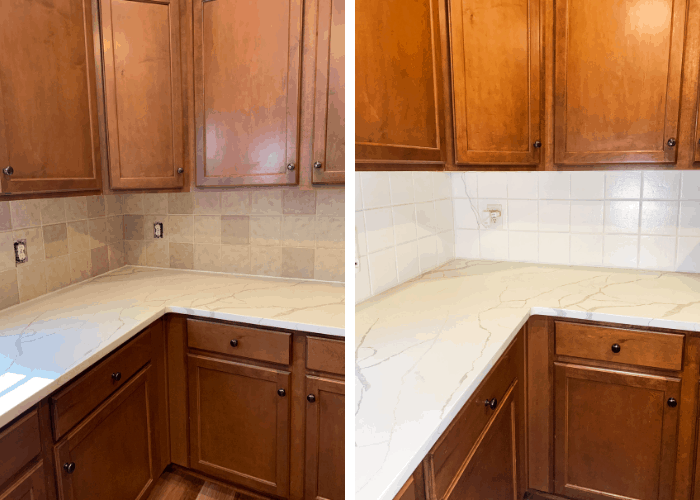
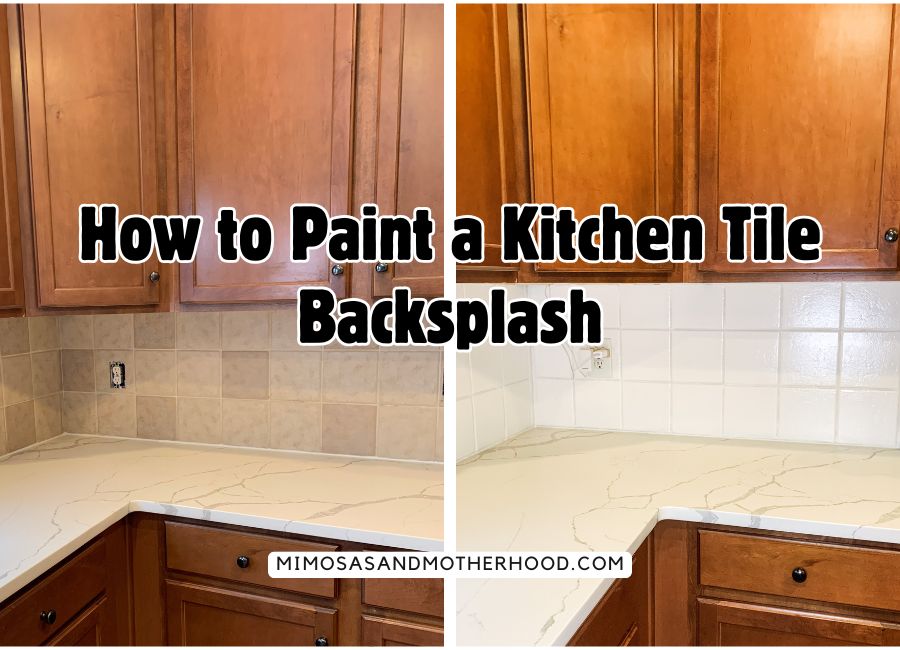
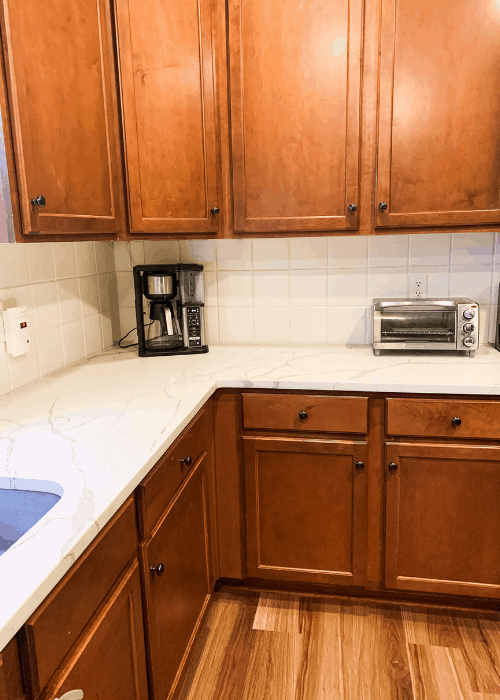
Check out that before and after. I love how it turned out!
I’m thrilled to share that not only is our painted kitchen tile backsplash holding up really well, but everyone who has seen it in person is shocked that it’s just paint! Painting a kitchen tile backsplash turned out to be one of my favorite and most budget-friendly DIY projects I’ve ever done.
Painting tile is an easy DIY project that can be done in just a few days and for a fraction of the cost of replacing tile. It creates a big impact for just a little bit of money, and is a wonderful way to update your kitchen (or tile anywhere in your house)!
Note: Some links may be affiliate links. That means I may make a commission if you use my links to purchase, at no extra added cost to you! I only recommend products that I personally love and believe in. Full disclaimer here.
Painting a Tile Backsplash
Painting a tile backsplash is so easy and so worth it! It came out perfectly, and I was honestly shocked after the paint dried with the immediate way it brightened our kitchen up!
If you’re thinking about painting your tile, I’m going to give you a rundown of exactly how to achieve the best result: what to do, what not to do, and the best kind of paint to use. Just follow these easy steps!
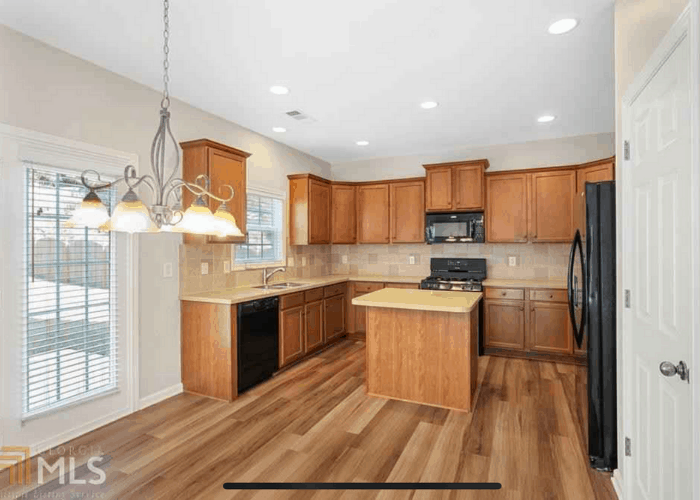
Here’s the original photo of our kitchen from the real estate listing when we bought it:
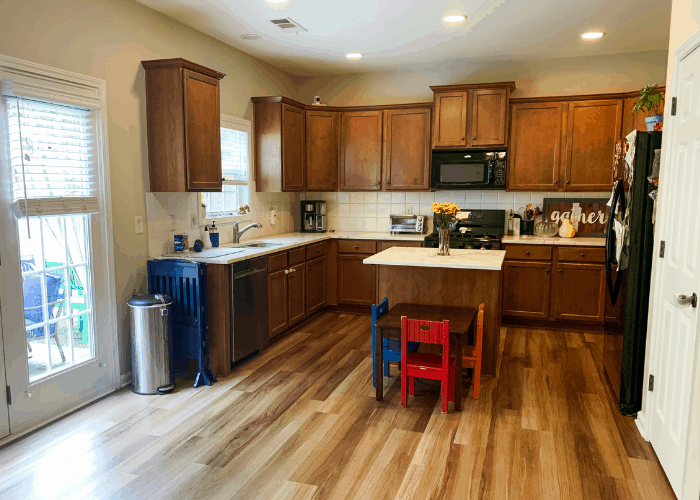
And here it is after replacing our countertops and painting our kitchen tile backsplash!
I should add that if you are planning on getting new countertops in addition to painting your tile, you want to have the countertops installed first.
Removing the old countertops could result in some chipping and peeling of your backsplash, so it’s best to wait until after they are ripped out before painting the tile.
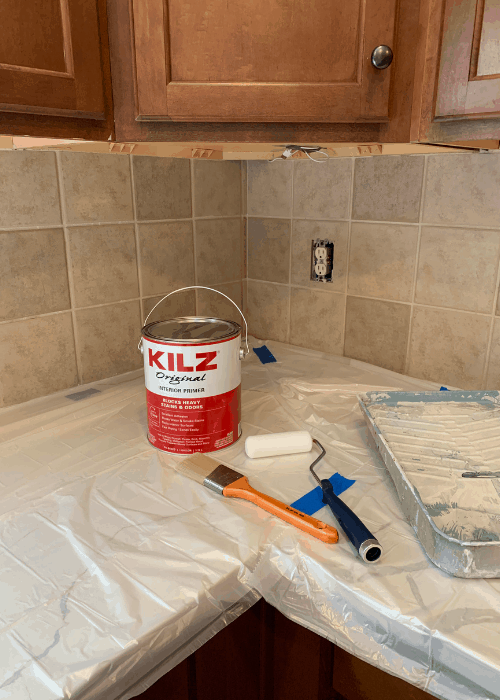
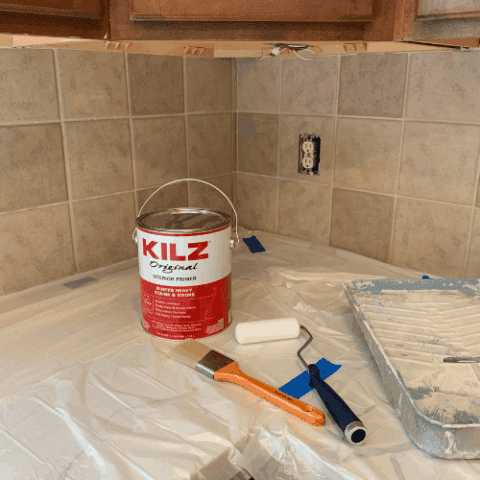
Supplies Needed for Painting a Tile Backsplash
While you can find these supplies at most big box retailers, I recommend looking first at your local Home Depot. They usually have everything you need in stock!
I’m linking all of the products below from there, so you can easily add to your cart and do curbside pickup.
- TSP or Krud Kutter
- Kilz Oil Based Primer
- Oil Based Enamel Paint in whatever color you want to paint your tile
- Quality Paint Brush for Oil Paint
- 4″ Mini Foam Roller Frame
- Extra Foam Rollers
- Scrub Brush or Old Rags
- Newspaper or plastic drop cloths to cover your countertops
- Painter’s Tape
- Bucket
- Mineral Spirits or Paint Thinner (you can’t clean oil-based paints and primers with soap and water)
Painting Tile Backsplash Tips
Your kitchen is the space in your home that probably sees the most action! When it comes to being successful with painting tile, the most important thing you need to do before you ever lift that paintbrush is to clean the tile surface like crazy.
After doing a lot of research, I used TSP cleaner to do this. It guts through grease, oil, dirt and caked-on gunk easily and thoroughly, and is an essential step to how to paint tile successfully.
I cleaned the tile twice: once using old rags and the next time with a scrub brush when I felt like the rags didn’t get all of the junk off.
Next, be sure you thoroughly protect your countertops. It doesn’t matter how careful you think you are when you’re painting! The last thing you want are tiny little specks of paint all over your counters.
Be sure to use painter’s tape to help keep your drop cloth or newspapers in place, too. Tape around your appliances and under the kitchen cabinets.
Priming your tile surface is also necessary, as you want to be sure that your paint really sticks. Be sure you choose the right tools too, like paint brushes that are made for oil-based paint, as well as a foam roller.
Give yourself two full days for drying time and ventilation. Oil-based primer has a really strong smell, so you want to be sure you prime your tile on a day where you can open the windows.
If you have kids, do this when they’re not at home! I sent mine to my parent’s house for the day!
Work in small sections and don’t overpaint the tile surface. You’re always going to feel tempted to go back and touch up spot, but when you’re using an oil-based paint you want to avoid this.
I recommend one good coat of primer, but you can apply a second after letting the first coat dry for a full hour if you want to.
You’ll also need a least two coats of paint. Be sure you give yourself adequate drying tile with oil-based paint (between 12-24 hours between coats). I chose to use an oil-based paint that has a gloss finish and didn’t require any sealer. It was a little bit more expensive, but it wipes clean super easily!
I chose to paint over the grout lines, and I love the way that looks. This technique is great not only for painting a kitchen tile backsplash, but for bathroom floors, cement tiles, ceramic floor tiles and more!

How to Paint Tile
1. Prep the Tile
Before getting started, remove all of the outlet covers and store them somewhere safe and easy to find later. Turn off the power to your kitchen outlets.
Next, thoroughly clean the tiles. I recommend using TSP powder mixed with water in a mop bucket, mixed according to the box directions. Be sure to wear gloves! You can scrub the tiles with old rags, but I found that they got cleaner using a scrub brush like this one.
You want to REALLY scrub, as if any residue is left on your tiles the paint won’t adhere properly. This means you’ll risk it peeling or chipping down the road.
Scrub every surface of the tile, and pay special attention to the area around the stove and behind the cooktop as grease tends to collect here.
Let the tile dry completely, then cover your countertops, cooktop and anywhere you don’t want to risk getting paint on with newspaper or drop cloths. Tape down this cover to make sure you don’t accidentally splatter any paint if it shifts.
2. Prime the Tile
After doing a ton of research and reading other tutorials, one of the most valuable things to extend the life of your painted tile is to prime it first. Kilz Oil-Based Primer is highly recommended for this kind of project, and is the one I chose to use as well.
You can find this at nearly any big box or home improvement store, including the Home Depot and Walmart.
Be aware that oil-based primer has a STRONG smell. You’ll want to prime your tile on a day that you can keep the windows open. If you have children, be sure it’s a day they’re either at school or can spend the day somewhere else!
If you want to apply a second coat of primer, according to the manufacturer, Kilz will be ready for a second coat after 1 hour. Add more drying time if you’re in a high humidity or low temperature area. Give the primer plenty of time to dry before the next step (the general recommendation is 24 hours).
3. Paint the Tile
I chose this oil-based paint from Sherwin Williams. I chose to go with a simple white, but the options for paint colors are really endless with this project! It all comes down to personal preference.
Working in sections, brush the top and bottom with paint first, and then use the small roller to do the rest, applying thing coats. You’ll want to be sure the section is totally covered before moving to the next, as you don’t want to do touch-up’s as oil-based paint gets tacky quickly.
Be sure to give yourself plenty of dry time. I recommend waiting a full 24 hours for the paint to dry before a second coat.
Follow the same process of working in sections, making sure each small area is fully coated before moving onto the second.
One of the reasons I chose this oil-based paint from Sherwin Williams was because it didn’t need a top coat! This meant I could do the project faster and for less money, which is always great.
Love DIY Projects? Check out these, too!
How to Make Your Own DIY Balloon Garland
Rainbow Wooden Outdoor Patio Furniture Makeover with Spray Paint
How to Paint a Tile Backsplash
Wondering how to paint tile? If you’re looking for an easy and budget-friendly way to update your home, painting tile is such an easy way to do so! Learn how to paint a kitchen tile backsplash, with steps that can be applied to painting tile in any room.
Materials
- TSP or Krud Kutter
- Kilz Oil Based Primer
- Oil Based Enamel Paint
- Quality Paint Brush for Oil Paint
- Foam Rollers
- Scrub Brush or Old Rags
- Newspaper or plastic drop cloths to cover your countertops
- Painter’s Tape
- Bucket
- Mineral Spirits or Paint Thinner
Instructions
- Before getting started, remove all of the outlet covers and store them somewhere safe and easy to find later.
- While wearing gloves, thoroughly scrub the tiles using TSP powder mixed with water in a mop bucket. Scrub every surface of the tile, and pay special attention to the area around the stove and behind the cooktop as grease tends to collect here.
- Let the tiles dry completely, then cover your countertops, cooktop and anywhere you don’t want to risk getting paint on with newspaper or drop cloths, being sure to tape it down securely.
- Next, use an oil-based primer like Kilz to prime your tiles. If you want to apply a second coat of primer you can do so after the first has dried for at least 1 hour. Allow the primer to dry for 24 hours before applying the first coat of paint.
- Paint your tiles using an oil-based paint. Working in sections, brush the top and bottom with paint first, and then use the small roller to do the rest, applying thing coats. You’ll want to be sure the section is totally covered before moving to the next, as you don’t want to do touch-up’s as oil-based paint gets tacky quickly. Wait a full 24 hours before applying a second coat (if desired).
- Clean your brushes uses mineral spirits or paint thinner and dispose of properly.
Notes
- Oil-based paint and primer can't be cleaned with soap and water. You'll need to use mineral spirits or paint thinner to clean them. You also cannot pour paint thinner or mineral spirits down the toilet or sink, so be sure to check your local county guidelines for disposal.
- Oil-based paint becomes tacky quickly, so you'll want to work in small sections to avoid dragging the paint through a tacky area. If you realize you missed a spot, it's better to wait until you apply a second coat and get it then.
- Oil-based primer has a STRONG smell, and requires adequate ventilation for safety. The best move is to do this project on a day that you can open all of your windows, and make sure your family isn't at home while you prime.
What Kind of Paint Do You Use to Paint Tile?
I recommend using an oil-based paint for painting kitchen tiles as there is less of a risk of peeling or flaking. Depending on what kind of tile surface you are updating, you can also use latex, acrylic latex and enamel paints, too.
The most important part is preparing the surface and is using a quality primer first before painting! Be sure to research your paint option before purchase to make sure it’s the right paint for your project.
Can I Use this Technique for Ceramic Tile Floors?
Absolutely! If you want to refresh old tiles, this technique for painting a tile backsplash can also be easily tweaked to paint an entire floor. Be sure to still work in small sections using a paintbrush and paint roller.
Apply thin coats on the bathroom tile floor (or whatever indoor tile floor you are updating). Don’t forget to apply primer as a base coat, too.
Remember to use painter’s tape to protect the bathroom walls or any areas in the room you don’t want paint to accidentally end up on. For high-traffic areas, it’s a good idea to apply a top coat. Be aware of the type of finish you choose, as glossy surfaces can be slick.
Floors are a great place for fun stencil designs. Check out these tile stencils on Amazon!
Final Thoughts on Painting a Kitchen Tile Backsplash
I’m thrilled with the way our painted tile backsplash turned out! It’s a huge change for a very little amount of money. Between all of the supplies needed we ended up spending less than $100 on painting the tile, and just look at the huge difference in the before and after!
If you’re on the fence about trying it, I highly recommend giving it a try. I was so nervous about how this project would turn out, and honestly I’m in love with not only how simple the project was, but what an incredible budget-friendly transformation it truly was. It’s such a great option to breathe new life into your home!


Hi there!
Do you recommend getting new countertops first then paint tile?
Hi Michelle! As long as you are good with being careful and properly taping your countertops, you should be fine replacing them first! It also allows you to install any new grout you need between the counters and tile prior to painting.
Hello!!!
I love this and am 100% adding to my list of spring refreshes! Wondering if you moved your oven at all to paint tiles or just painted around the oven.
Hi! I scooted it out just a bit, but didn’t have to move it very far.