How to Make Your Own DIY Balloon Garland
Wondering how to DIY your own balloon garland at home? It’s so much easier than you think! Whether you want to DIY a balloon arch for a baby shower, birthday party, wedding or more, balloon arches are the perfect way to make any day special. Read on for how to DIY a balloon arch without helium with this easy step by step tutorial.
I’m basically a kid at heart, and I’m not lying when I say I love balloons. I knew for Baby A’s 1st birthday that a balloon arch or two was a necessity, but some of the DIY tutorials out there were a little bit overwhelming.
I’m so excited I stumbled across the absolute easiest way to create a DIY balloon garland arch. I’m not joking: I found out about this product seriously 2 nights before A’s birthday party, and am SO thankful for Amazon Prime! I ordered everything we needed for two balloon garlands for UNDER $50!
Note: Some links may be affiliate links. That means I may make a commission if you use my links to purchase, at no extra added cost to you! I only recommend products that I personally love and believe in. Full disclaimer here.
How to DIY a Balloon Arch Without Helium
Over the past few years I’ve fallen in love with creating DIY balloon arches at home! My number one tip for a gorgeous party on a budget is to DIY as much as possible, and I knew that figuring out how to create a balloon garden ourselves would save a ton. I was quoted anywhere from $100 to $500 just for one 5 foot balloon garland from outside companies!
There was no way that worked for our budget and knew I could DIY a balloon arch without helium on my own. I ordered everything we needed to DIY two balloon garlands for UNDER $50!
We received so many compliments on our DIY balloon garland that I knew I had to create a tutorial. You won’t believe how easy and inexpensive this project is! It’s also really easy to personalize your DIY balloon arch by incorporating your color scheme, adding extras (like leaves and flowers) or changing the length.
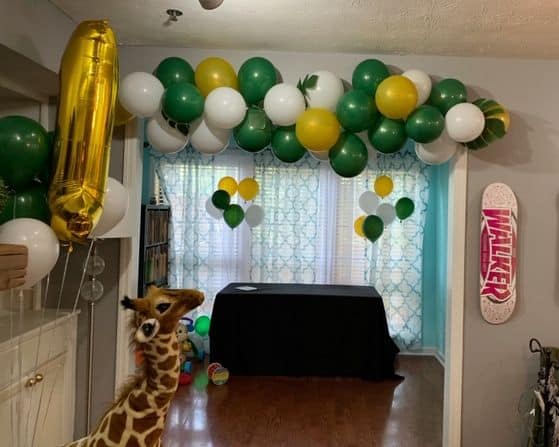
For Baby A’s party we did a Welcome to the Jungle Wild One theme, and went with green, gold and white balloons with jungle leaves. It was so fun to make my own balloon garland to go with it!

Below you’ll find an easy step by step tutorial on how to make your own balloon garland at home. If you prefer video, be sure to check out my Instagram page, where you’ll find a Balloon Garland highlight with even more details.
What Materials Do You Need to Make a Balloon Garland?
Forget the glue dots or glue gun! All you need to make your own DIY balloon arch are:
- Balloons in various colors- I chose 3 colors recommend using 10-20 balloons in each color, depending on how long your arch is. I chose this pack from Amazon.
- Balloon Garland Plastic Strip, like this one from Amazon.
- Push Pins (if hanging on wall) or Fishing Line or String (if making a longer ballon arch)
- Embellishments (we chose these jungle leaves to go with our Welcome to the Jungle Wild One theme)
How to Make Your Own Balloon Garland at Home
It’s super easy to DIY balloon garlands. Just follow these step by step instructions:
Step 1: Arrange each color of balloons into three separate piles. This will allow you to easily see what you have left and grab the color you need next. When it comes to the exact balloon colors or number of different balloon colors, that is entirely personal preference. I like to include at least 3 colors when I create a DIY balloon arch.
Step 2: Blow up your balloons with air, not helium. This is by far the most time consuming and tedious part of the DIY Balloon Garland. I recommend either recruiting some friends and family to assist, or spending a little extra and getting an air compressor or balloon pump. Experiment with different size balloons! I blow up a few smaller balloons to create different depth and design.
Step 3: Attach your blown up balloons to the balloon garland strip. You’ll see that the strip has both a large hole and a smaller hole. Insert the knot of the balloon into the large hole, then pull the knot forward to secure it in the small hole. Be sure that the actual knot has come through, otherwise the balloon can easily fall off. Be sure you’ve tied a big enough knot at the end of each balloon so that they don’t pop out of the balloon tape!

Continue to add balloons to the plastic strip in the pattern you desire. I chose to add two of each color at a time.
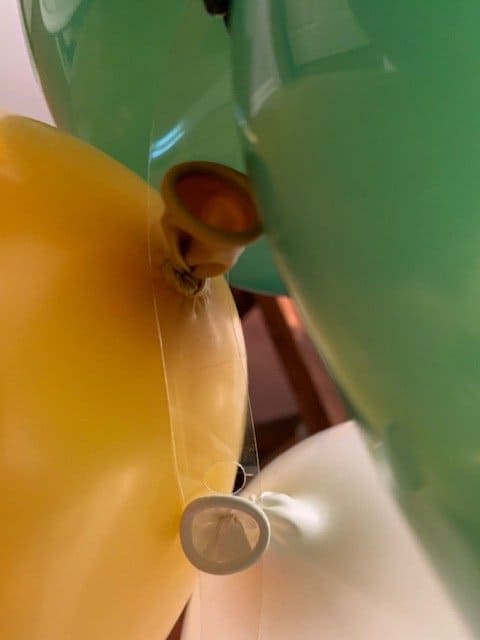
Using a balloon strip is such a game changer! If you want a very full balloon arch or balloon garland, you’ll want to not skip any of the pairs of holes (pair of holes = the small and large holes that are attached to each other). I chose to skip one pair of holes between every new color, as I wanted to stretch our balloon garland out and pin to the wall.
Pro Tip: If you’re looking to make a big impact, use both larger balloons and smaller balloons in your DIY balloon arch. Having a combination of various sizes makes a big visual impact! You can also try using balloon pairs, to make sure you have colors spaced out evenly.
Step 4: Add any embellishments to your DIY balloon arch that you want! We added jungle leaves to go with our Wild One theme.
Step 5: Hang your balloon garland. We made two DIY balloon garlands, and chose to hang them on the wall as accent decor. I simply used push pins! You can also use command hooks, which can be picked up nearly anywhere.
The smaller DIY balloon arches are great to go over a dessert table or present tables, too. They’re an easy way to add a pop of fun! If you are making a larger garland to use as a balloon arch, you’ll want to anchor the ends of the arch to the ground utilizing fishing line or string.
While you can absolutely secure your balloon garland by yourself, for safety I recommend having a spotter if you’re going up on a step stool. To secure your DIY balloon arch, you can use push pins, command strips, or even just tie fishing line or string through the holes of the balloon tape and tie it around a pole! Zip ties are another great way to anchor the ends of the balloon garland, too.
That’s seriously it! This Balloon Decorating Strip from Amazon is seriously a game changer. It made creating our own DIY Balloon Garland so incredibly easy, and I hope it helps your party planning too!
Can You Make a Balloon Arch the Night Before?
Short answer: YES, you can absolutely make a balloon arch the night before a party! As you are blowing up balloons with air, instead of helium, your balloons will actually last for quite a few days. We made this balloon arch the night before Archer’s 1st birthday party; we made the balloon arch for this 2nd birthday party 3 days before.
You can also snag a balloon arch kit if you want to make things even easier. Check out a few options here.
How Many Balloons Does it Take To Make a Balloon Arch?
The number of balloons you use is totally up to you. This depends on how big you want your balloon arch to be. If you are making a single small balloon arch, I recommend ordering at minimum a package of 40 balloons to be safe. I actually always get 50-100 balloons when I’m making my own balloon arch to be sure I have enough.
I recommend picking a main color or two to work from. I usually use at least 3 different colors of balloons, and make sure I have a good number of balloons of each color. When you’re working on creating your first balloon arch, blow up various sizes and numbers of balloon as a starting place. The more you repeat these steps each time you create a DIY balloon arch, the easier it will be for you to know right off the bat the number of balloon you’ll want to use.
If you blow up too many balloons, don’t worry! Use them as decor in other parts of the party. If you have little ones, balloons on the ground make for extra fun!
How Long Does it Take to Make Balloon Garlands?
Again, this depends on how big you want your balloon garland or balloon arch to be. If you are using the electric balloon pump I recommend, you can do it in less than an hour!
Give yourself a little bit extra time to make your balloon garlands. It’s better to have more time than you need, then to not leave yourself enough time.
I recommend giving yourself an hour to create your first batch of balloon garlands. Over time you’ll become much faster, and it helps to have an extra set of hands!
Can you DIY a Balloon Arch Without Helium?
YES! You can absolutely DIY a balloon arch without helium by following the steps above. In fact, I think it’s much easier to make your own balloon garland without helium.
By using an air pump, instead of a helium tank, you cut your price way down. You also are able to keep track fo the balloons a lot more easily.
You can also use your own lungs to blow up the balloons. Just know that it will take much longer to make your balloon garlands, and honestly you’ll be a little worn out! I tried this route the first time I made a balloon garland and I was EXHAUSTED when I finished blowing up all of the balloons!
Creating a DIY Balloon Arch is Fun, Fast and Easy!
This has been one of my favorite ways to make special days even more special. I love creating quick and easy balloon garlands for birthday parties for my boys, because it’s so simple and easy. I would love to see yours when you’re finished!
Tried this balloon arch? Tag me today! I love seeing what y’all are up to!
Mention @simply.siobhan or tag #MimosasAndMotherhood!


These looked so great at your parties. I loved them.
Thank you so much! =)