Air Dry Clay Christmas Ornaments
Learn how to make easy air dry clay ornaments with this step by step tutorial. DIY air dry clay Christmas ornaments make charming handmade gifts and gift tags, too!
There’s something special about handmade Christmas ornaments. Raise your hand if you discovered special ornaments you made as a child in carefully preserved in a box in your parent’s attic as an adult!
Each Christmas I love to craft with our children, and this year they were both finally old enough to help create ornaments! My boys love craft projects, so I wanted to do something together where they could really create as much as possible independently.
Have you ever made air dry clay before? Earlier this year we discovered how easy it is to make at home, so I couldn’t resist creating easy air dry clay Christmas ornaments with the boys.
Trust me when I say that the clay is so much easier to make than you expect! To make this craft even easier, we used cookie cutters to create the designs! These easy air dry clay ornaments not only will look great on your tree, but are also perfect to give as a handmade gift for someone special. You can also use them to create beautiful gift tags, too!
Using air dry clay is a quick and easy way to craft with your kids and is an awesome project for any skill level (including young children). In fact, I created these adorable air dry clay ornaments with my toddlers, who are 2 and 3!
I made the dough and let it cool before they were allowed to help, but they really didn’t need much help when it came to using the cookie cutters independently.
These DIY air dry clay ornaments are far from perfect, but I truly believe that’s part of their charm. This also means there’s no need to stress about creating a “perfect” Christmas craft, or being worried if wrinkles or cracks appear.
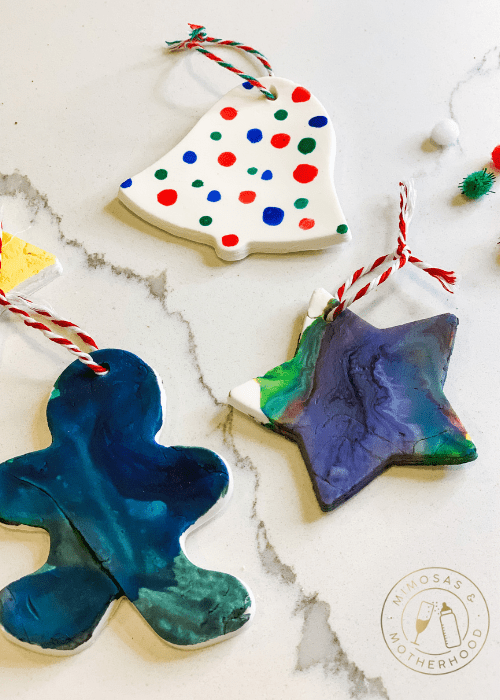
No two ornaments are alike, and the tiny imperfections make them extra special. Whether you choose to put these up on your Christmas tree like we did, or give them as special gifts, these air dry clay ornaments are simple, fun and easy to make!
Let’s get started!

Note: Some links may be affiliate links. That means I may make a commission if you use my links to purchase, at no extra added cost to you! I only recommend products that I personally love and believe in. Full disclaimer here.
Basic Supplies Needed to Make Air Dry Clay Christmas Ornaments
To make the clay:
Baking soda
Cornstarch
Water
Cooking pot
Wooden spoon
Parchment paper (or wax paper)
Skewer stick or other toothpicks
For decorating the ornaments:
Paint
Glitter
String or ribbon of choice
How to Make Homemade Air Dry Clay Christmas Ornaments
If you’ve never made your own air dry clay before, you’re in for a treat! This recipe is so incredibly easy to mix up. The best part? Even the littlest helpers can take an active role in the creation of these simple and easy Christmas ornaments.
This toddler-friendly craft only requires four steps:
Step 1: Make air-dry clay
Step 2: Cut out the ornaments
Step 3: Let dry
Step 4: Decorate!
Making air-dry clay is hands down the easiest thing ever, and it’s even easier than making playdough. We love making this pure white modeling clay because it’s perfect for kid’s projects and creative creations. It only takes a couple of minutes and doesn’t require a lot of ingredients.
Be sure to scroll down to the end of this post for an easy to print version of this air dry clay recipe, too!
Step One: Make the Air Dry Clay Recipe
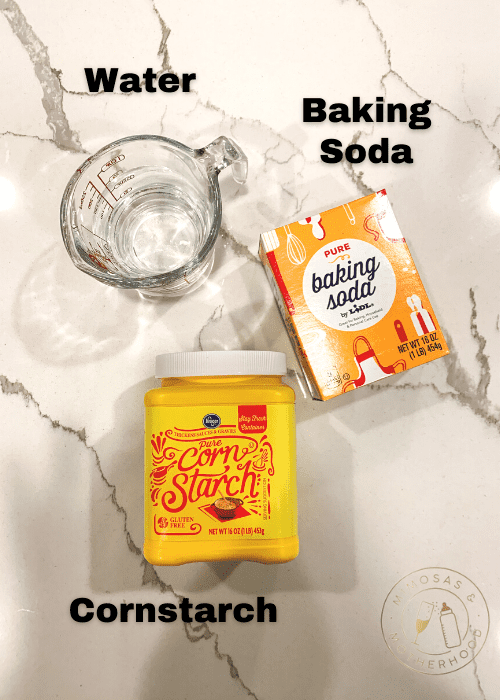
This 3 ingredient air dry clay recipe is so easy, and you probably already have these ingredients in your pantry. While some recipes might call for glue, this easy air dry clay recipe only uses water, baking soda and cornstarch!
Mix the baking soda, cornstarch and water together in a medium pot over medium-low to medium heat. Cook and stir constantly until the consistency looks and feels like mashed potatoes (usually about 5-10 minutes). Turn off the heat and remove the clay from the warm pot, let it cool for a couple of minutes.
That’s it! In the meantime, dust a clean surface with corn starch. When the clay is cool to touch, spread it out on the dusted surface to start kneading the bread until the tacky feeling subsides and the dough becomes smoother.
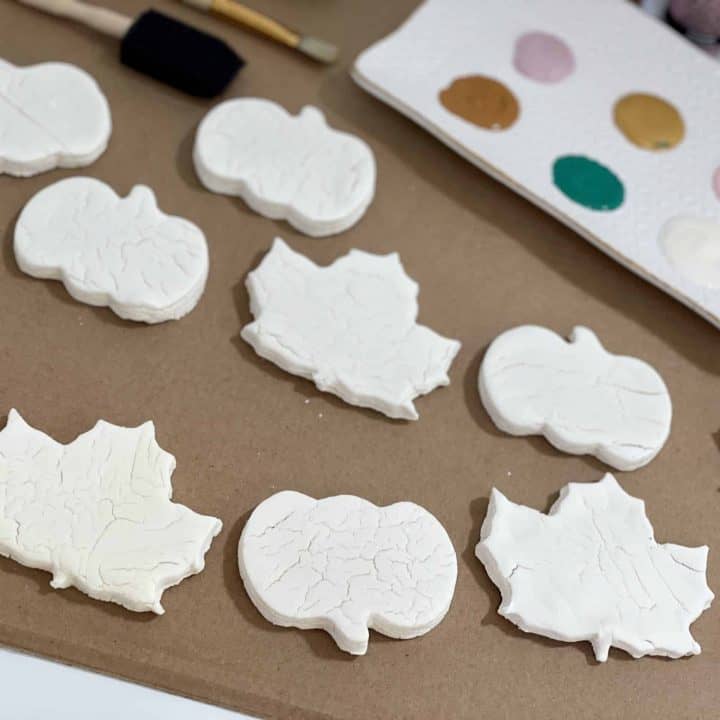
Step Two: Cut out the Air Dry Clay Ornaments
To make your air dry clay ornaments or design pieces, you’ll need a few materials before you get started.
Christmas cookie cutters, like this awesome set
Parchment paper or wax paper
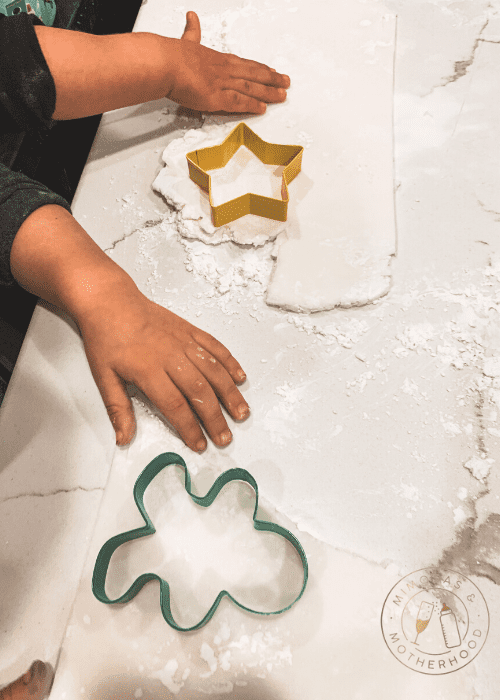
There are a few different ways to make the ornaments. You can create air dry clay pieces either by using the rolling pin to flatten the dough and use cookie cutters for designs, OR you can create your own sculptures that you allow to dry.
This is where the fun starts, and is a great place for your kids to help with the clay! After rolling out the dough, let your children use the cookie cutters to cut out each ornament shape. Be sure to be mindful if you are using metal cookie cutters, as little fingers can easily get squished!
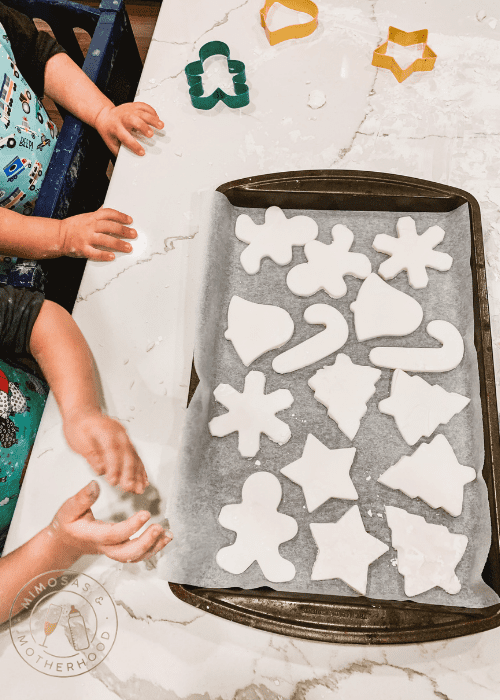
Place each cut out design on a baking tray or cookie sheet that’s covered with parchment paper. Using the skewer or toothpick, poke a hole at the top of each clay piece for the ribbon to go through once they’re dry. Be sure you make a big enough hole!
Step Three: Let the Ornaments Dry Fully
You can leave the air-dry clay ornaments out 12-24 hours to dry by themselves (speed will depend on thickness of the air dry clay ornaments), or you can pop it in the oven and bake it for 2 hours at 200F for a quicker drying process.

Step Four: Paint and Decorate the Air Dry Clay Ornaments
Once the air dry clay ornaments are hard and completely dry, it’s time to decorate! You’ll need a few more materials for this part of the project:
Paint brushes (this set is a good choice with lots of brush options)
As this was a craft that I did with my toddlers, we used washable, non-toxic paint only. However, you can choose whatever is appropriate for your own family! Glitter, spray paint, acrylic paint, puff paint and glued on accessories all make for a fun and unique ornament.
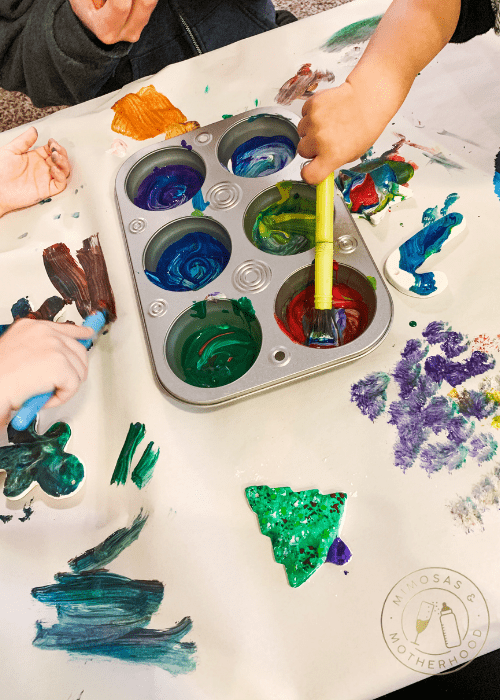
Let your children decorate their own ornaments! You might be surprised to discover a hidden artist: can you believe my 2 year old created that amazing marble look on this star ornament??
After the ornaments are dry, loop a piece of string, twine or ribbon through the hole at the top, and you’re done!
Homemade Air Dry Clay Christmas Ornaments Tips
- Be sure to roll your clay out on a smooth surface. You can use a countertop, cutting board or pie crust mat as long as its a flat surface. The clay washes off easily with soap and water!
- Leftover clay can easily be re-used. Any excess clay that is pulled off around the cookie cutters can be re-rolled. If you make a mistake, just mold it into a ball and roll it back out again.
- Don’t forget to poke the holes at the top of your ornaments before they dry! Be sure you make a hole that is large enough for your string or ribbon of choice to go through.
- To extend the life of your art, I recommend spray your ornaments with a clear top coat like this after they have fully dried after painting (especially if you are using washable paint). You can find different brands of this easily found at places like Home Depot, Target and Amazon.
- The air dry clay recipe used in this tutorial takes up to 24 hours to dry and does not require baking; however, I prefer to pop mine in the over to speed it up. It’s up to you!
- If your clay begins cracking when you’re working with it, just add a few drops of water with your fingertips to create more moisture and pliability. You can also use a little water to smooth any rough edges.
The clay recipe is safe for all ages to use, so grab the little ones and have some fun!
More Christmas Crafts:
Cardboard Christmas Tree Pasta Craft
Giant Gingerbread Man Christmas Craft
DIY Christmas Crafts for Toddlers
Mistletoes Easy Christmas Footprint Craft (Great Baby’s First Christmas Craft)
How to Make Air Dry Clay - Easy Air Dry Clay Recipe
Here’s an easy air dry clay recipe to use for any occasion! It's the perfect homemade air dry clay recipe to use to create a variety of fun projects, crafts and easy DIY gifts.
Materials
- 1 cup baking soda
- 1/2 cup cornstarch
- 3/4 cup water
Instructions
- In a small pot over medium-low heat, mix together the cornstarch, baking soda and water.
- Cook while stirring constantly for 10-15 minutes until the mixture becomes thicker. Once the consistency looks and feels like mashed potatoes, turn off the heat and remove the clay from the warm pot.
- Allow the dough to cool for a few minutes, and then place on a surface coated with additional cornstarch.
- Begin kneading the clay. Add more cornstarch as needed until the clay becomes smooth and the tacky texture is gone.
- Create your shapes and designs any way you would like! You can roll it out using a rolling pin and use cookie cutters to create easy designs, or form it into small sculptures by hand.
- To dry, just place your air dry clay creations on a drying rack overnight. If you need them dry faster, you can pop it in the oven and bake them for 2 hours at 200F.
How long do air dry clay ornaments last?
One of the beautiful things is that if stored correctly, air dry clay ornaments will last for years! Be sure you store them flat in a plastic bid with an air-tight lid. If you want them to last even longer, I recommend spraying your finished ornaments with a clear coat like this one after they are totally dry.
Can you use cookie cutters for air dry clay?
Yes, you can absolutely use cookie cutters for air dry clay ornaments, and that’s what I chose to do this year! Air dry clay is soft and easy to work with, and is the perfect craft project for using cookie cutters. I love how easy it made it for my children to make their own, too!

Air Dry Clay Ornaments are Fun and Easy!
These cute ornaments are perfect for the holiday season and are so much fun to create for the whole family! I hope you enjoyed this simple tutorial. Handmade ornaments are a great way to create items that will bring your family joy for years to come. This easy craft also makes wonderful and unique holiday gifts.
If you create these ornaments with your family, I would love to see! Tag me on Instagram @simply.siobhan or using the hashtag #mimosasandmotherhood.
Happy crafting!


Love this, so easy and fun!
They really are!
I love these, they would look great on our tree.