Toddler-Friendly DIY Fall Wreath with Easy Air Dry Clay Recipe
Making a simple toddler-friendly DIY fall wreath is the perfect way to get the kids excited about autumn! This fun and easy air dry clay recipe is perfect for creating so many projects that little hands can help with.
Feel that chill in the air? Or maybe you’re just wishing it was here, like me 😉 Autumn will be here before we know it!
Yearning to get into the seasonal spirit a little bit early? This toddler-friendly DIY fall wreath made with an easy air dry clay recipe is the perfect way to get started. Your littles will be so proud of their creations, especially when they see it displayed on the front door.
This creative and fun DIY air dry clay fall wreath was created by guest blogger Rozanne of Bright Little Brains. Rozanne is a teacher by profession and currently a stay-at-home mom to a four-year-old son and two-year-old daughter. She is also the creator behind the amazing Instagram account “Bright Little Brains,” an educational account full of wonderful kids DIY projects, activities and tutorials to help other parents find ideas and inspiration!
Note: Some links may be affiliate links. That means I may make a commission if you use my links to purchase, at no extra added cost to you! I only recommend products that I personally love and believe in. Full disclaimer here.

How to Make a DIY Air Dry Clay Fall Wreath
If you’ve never made air dry clay before, you’re in for a treat! This recipe is so incredibly easy to mix up. The best part? Even the littlest helpers can take an active role in the creation of this toddler-friendly DIY fall wreath!
Here’s an easy homemade air dry clay recipe to use for any occasion! While we will be using this recipe to make a fun fall air dry clay wreath, you can incorporate this into any holiday.
Great ideas for this easy air dry clay recipe include Christmas ornaments, fancy place settings for Thanksgiving, or even easy DIY gifts that your toddlers can help make!
This toddler-friendly DIY air dry clay wreath only requires four steps:
- Step 1: Make air-dry clay
- Step 2: Make the ornaments
- Step 3: Paint
- Step 4: Decorate!
Step One: Make the Air Dry Clay Recipe
This 3 ingredient air dry clay recipe is so easy, and you probably already have these ingredients in your pantry. While some recipes might call for glue, this easy air dry clay recipe only uses water, baking soda and cornstarch!
Making air-dry clay is hands down the easiest thing ever, and it’s even easier than making playdough. We love making this pure white modeling clay because it’s perfect for kid’s projects and creative creations. It only takes a couple of minutes and doesn’t require a lot of ingredients.
Be sure to scroll down to the end of this post for an easy to print version of this air dry clay recipe, too!

How to Make Air Dry Clay- Air Dry Clay Recipe
Remember to scroll to the end of the post for the full step-by-step air dry clay recipe.
Ingredients:
1 cup baking soda
½ cup cornstarch
¾ water
Directions:
Mix all three ingredients together in a medium pot over medium-low heat. Cook and stir constantly until the mixture becomes tighter and thicker. This process might take a couple of minutes. Once the consistency looks and feels like mashed potatoes, turn off the heat and remove the clay from the warm pot, let it cool for a couple of minutes.

That’s it! In the meantime, dust a clean surface with cornstarch. When the clay is cool to touch, spread it out on the dusted surface to start kneading the bread until the tacky feeling subsides and it becomes more smooth.
More of a visual learner? Check out this easy YouTube tutorial to see step by step how to make air dry clay:
Step Two: Make the Air Dry Clay Ornaments
To make your air dry clay ornaments or design pieces, you’ll need a few materials before you get started.
- Rolling pin, like this one
- Autumn themed cookie cutters, like these
- Baking sheet, like this set
- Parchment paper, like this roll
You can create air dry clay pieces either by using the rolling pin to flatten the dough and use cookie cutters for designs, OR you can create your own sculptures that you allow to dry.

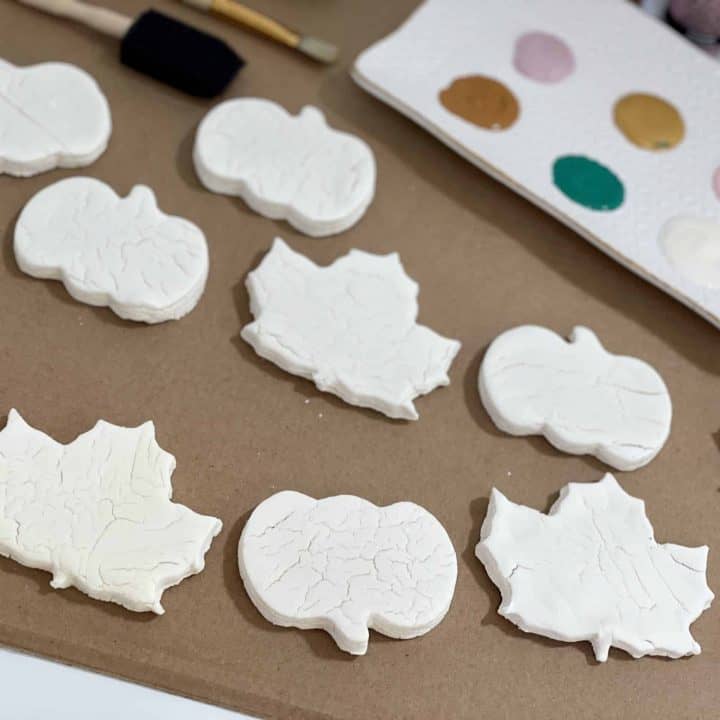
This is where the fun starts, and is a great place for your kids to help with the clay! Let your children use a rolling pin to roll the clay. Place each cut out ornament and creation on a baking tray that’s layered with parchment paper, and give them a few autumn themed cookie cutters to press into the flattened dough to create their own designs.
Be sure to be mindful if you are using metal cookie cutters, as little fingers can easily get squished!

For this toddler-friendly DIY fall wreath, we made a few cookie cutter design pieces, as well as some fun little pumpkins by rolling the clay in balls and using the back of a knife to make incisions.
Let the kids (especially older kids) be creative and create apples, corn or different leaves, or anything that makes them think of autumn and fall fun.
You can leave the air-dry clay ornaments and creations out overnight to dry by itself or you can pop it in the oven and bake it for 2 hours at 200F for a quicker drying process.
Step Three: Paint and Decorate the Air Dry Clay Pieces

Once the ornaments and other design creations are hard and totally dry, it’s time to paint! You’ll need a few more materials for this part of the project:
- Paint (love this set!)
- Paint brushes (this set is a good choice with lots of brush options)
For this easy toddler-friendly DIY air dry clay fall wreath, we made use of autumn themed color acrylic paint. Let your little ones help with painting and decorating the leaves and other pieces!
You can also add a bit of gold to some of the leaves and pumpkins to give the ornaments and creations a sparkling pop!
Step Four: Decorate the Wreath

The fun continues: it’s time to put it all together to create a beautiful wreath! You’ll want to snag a few last materials for this final step of this project, like:
- Grapevine wreath, like this
- Autumn themed decorations/accessories, like this assorted option
- Pinecones, like this assorted pack
- Air-dry clay ornaments/creations
- Bow, which you can craft out of this cute variety pack of ribbon
- Glue gun, like this one
- Wreath hanger, like this
A great idea is to let your children help pick out autumn-themed decorations that they like at the store. It’s a great opportunity to talk about the changing of the season, too!
You can also incorporate some nature finds into this fun DIY fall wreath. The pinecones from a recent hike were included in ours! If you want to make some other pieces, check out how to make an easy paper leaf.
If you don’t have the materials needed for air dry clay, you might like the best no-cook playdough recipe you can make with (or without!) a stand mixer!
Related Posts:
Easy Pumpkin Crafts for Toddlers
Fall Photoshoot Family Outfit Ideas

Decorating the wreath is actually quite simple. If you’ve never made your own wreath before, I recommend taking it step by step. Add one layer at a time of decorations, and go from there.
Play around with the layout of the decorations and ornaments. When you are satisfied with how the chosen decorations look, use a glue gun to adhere each to the wreath.
You can finish it off by adding a bow if you like, and hang it at the front door to enjoy the welcoming vibes of fall!
How to Make Air Dry Clay - Easy Air Dry Clay Recipe
Here’s an easy air dry clay recipe to use for any occasion! It's the perfect homemade air dry clay recipe to use to create a variety of fun projects, crafts and easy DIY gifts.
Materials
- 1 cup baking soda
- 1/2 cup cornstarch
- 3/4 cup water
Instructions
- In a small pot over medium-low heat, mix together the cornstarch, baking soda and water.
- Cook while stirring constantly for 10-15 minutes until the mixture becomes thicker. Once the consistency looks and feels like mashed potatoes, turn off the heat and remove the clay from the warm pot.
- Allow the dough to cool for a few minutes, and then place on a surface coated with additional cornstarch.
- Begin kneading the clay. Add more cornstarch as needed until the clay becomes smooth and the tacky texture is gone.
- Create your shapes and designs any way you would like! You can roll it out using a rolling pin and use cookie cutters to create easy designs, or form it into small sculptures by hand.
- To dry, just place your air dry clay creations on a drying rack overnight. If you need them dry faster, you can pop it in the oven and bake them for 2 hours at 200F.
This DIY Air Dry Clay Fall Wreath is Perfect for Autumn

Air dry clay is a great tool for some many projects! With the easy to master directions and simple ways to customize your creations, the opportunities for crafting are endless. Be sure to tag me if you create your own DIY Air Dry Clay fall wreath @simply.siobhan or using the hashtag #mimosasandmotherhood.
About Rozanne:
Rozanne is a teacher by profession and currently a stay-at-home mom to a four-year-old son and two-year-old daughter. Rozanne says “Educating is my passion, it’s my calling – I know I was born to do this.”
Rozanne is also the creator behind the Instagram “Bright Little Brains,” an educational account full of wonderful DIY projects, activities and tutorials to help other parents find ideas and inspiration! She has also recently opened her own Etsy shop with sensory play kits and materials, where she sells educational materials she personally uses in her activities.
Besides being a mom, teacher and small business owner, she also loves warm sunny days, hiking or taking the long road to explore the wonderful world around her. She’s a firm believer that you should make the most of the time you have, and you should live every day to the fullest!
Follow Rozanne on Instagram here, Facebook here and be sure to check out her Etsy shop here!


Wow this is so cool!
Isn’t it a fun idea? I’m excited to use the clay recipe to do more seasonal crafts too!