DIY Plastic Playhouse Makeover: How to Upcycle and Paint a Plastic Playhouse
Learn how to do a DIY plastic playhouse makeover with step-by-step instructions, the best spray paints for plastic, and creative color schemes to transform an old playhouse into a new favorite.
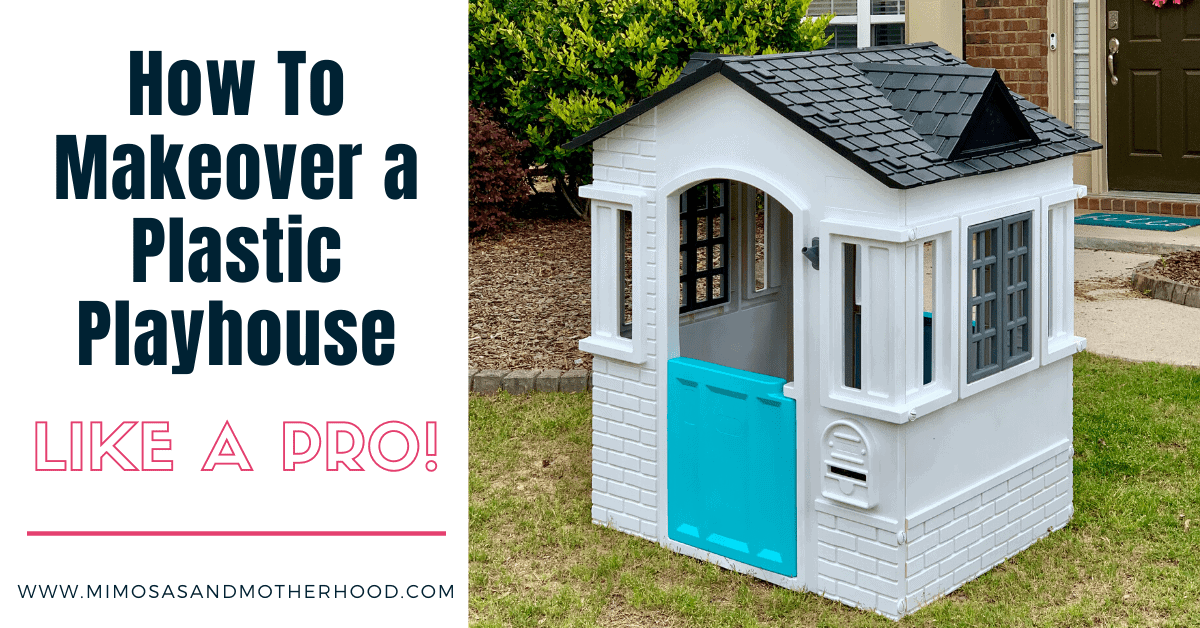
If you’ve ever scrolled through TikTok or Pinterest and seen those dreamy playhouse makeovers, you know how magical a little paint can make an old plastic playhouse look. Whether you scored a second-hand playhouse at a garage sale, inherited one from family, or want to give your own new plastic playhouse a fresh look, this step-by-step guide will show you exactly how to do a DIY plastic playhouse makeover that lasts.
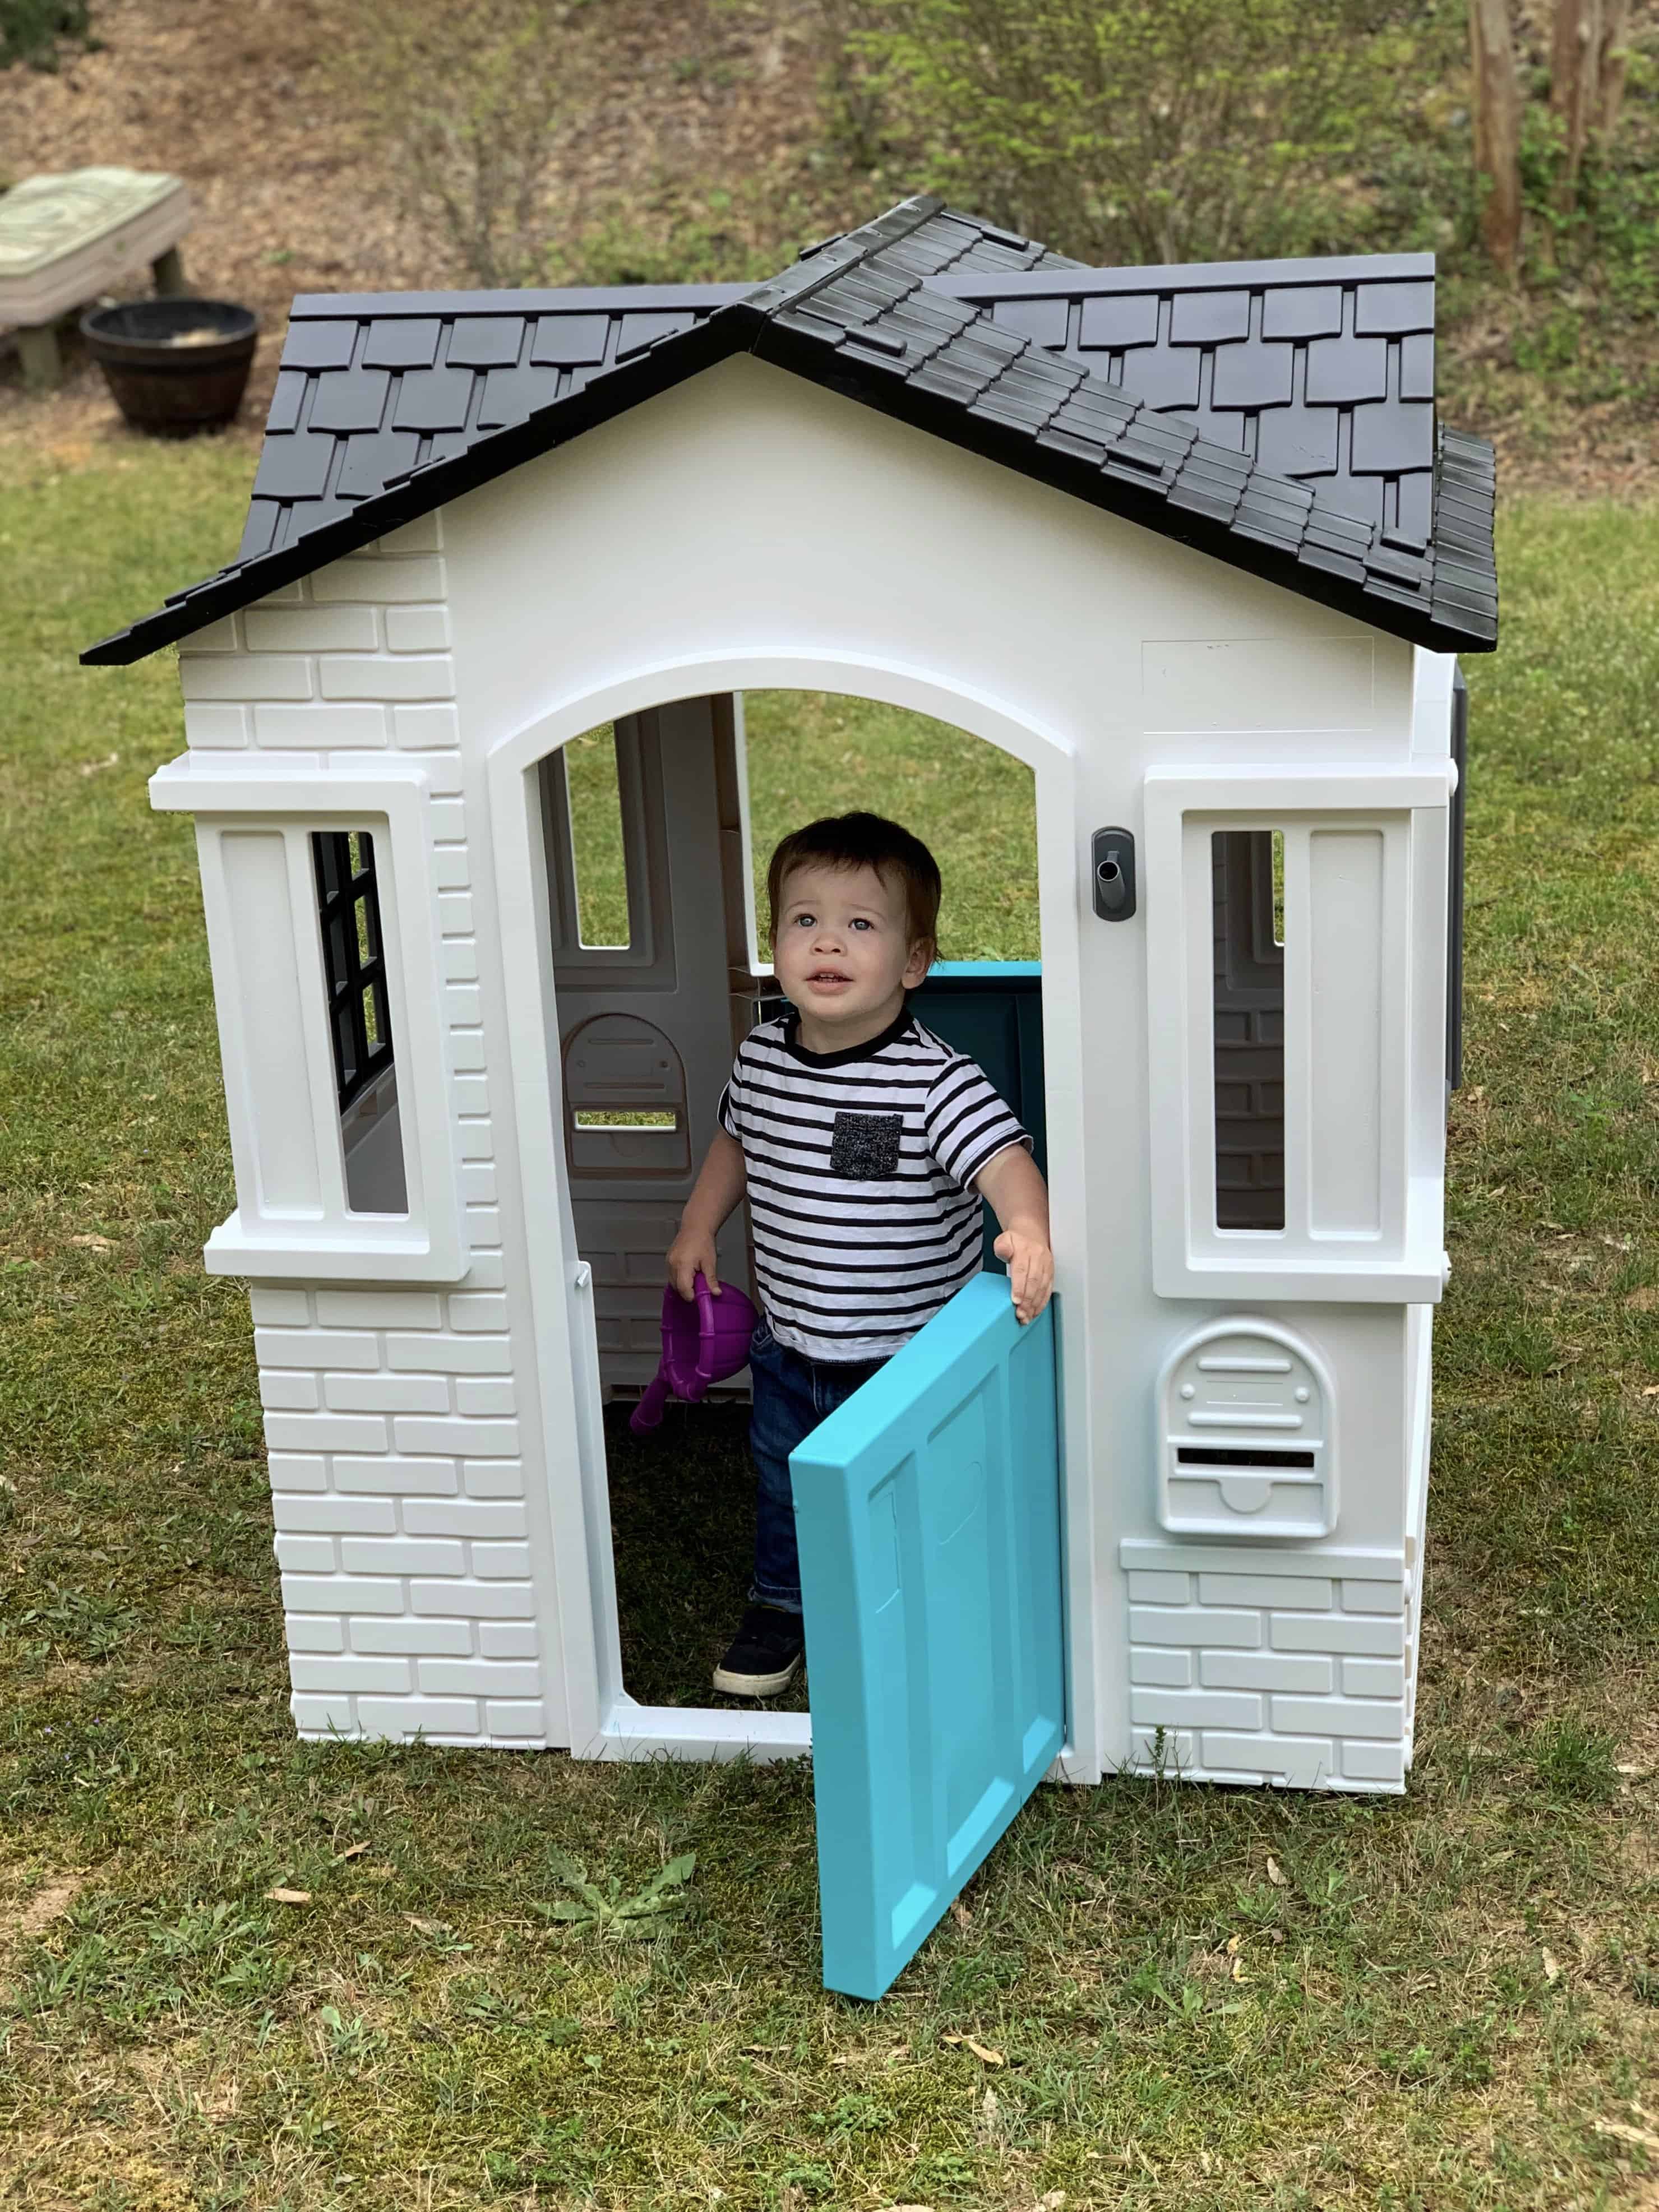
When my first son was about a year old (he’s now 7!), we were gifted a well-loved Little Tikes model playhouse. It had great bones but definitely needed a refresh.
With some creative ideas, a few coats of paint, and the right supplies, I was able to give it a new look that my boys now love. And the best part? The whole makeover took just one weekend.
This is a fun, easy fix for parents looking to upcycle toys instead of tossing them, and it’s such a great way to create a personalized play space for your kids. This post was originally created in 2020, and our playhouse stayed looking beautiful for years, even outside in the elements!
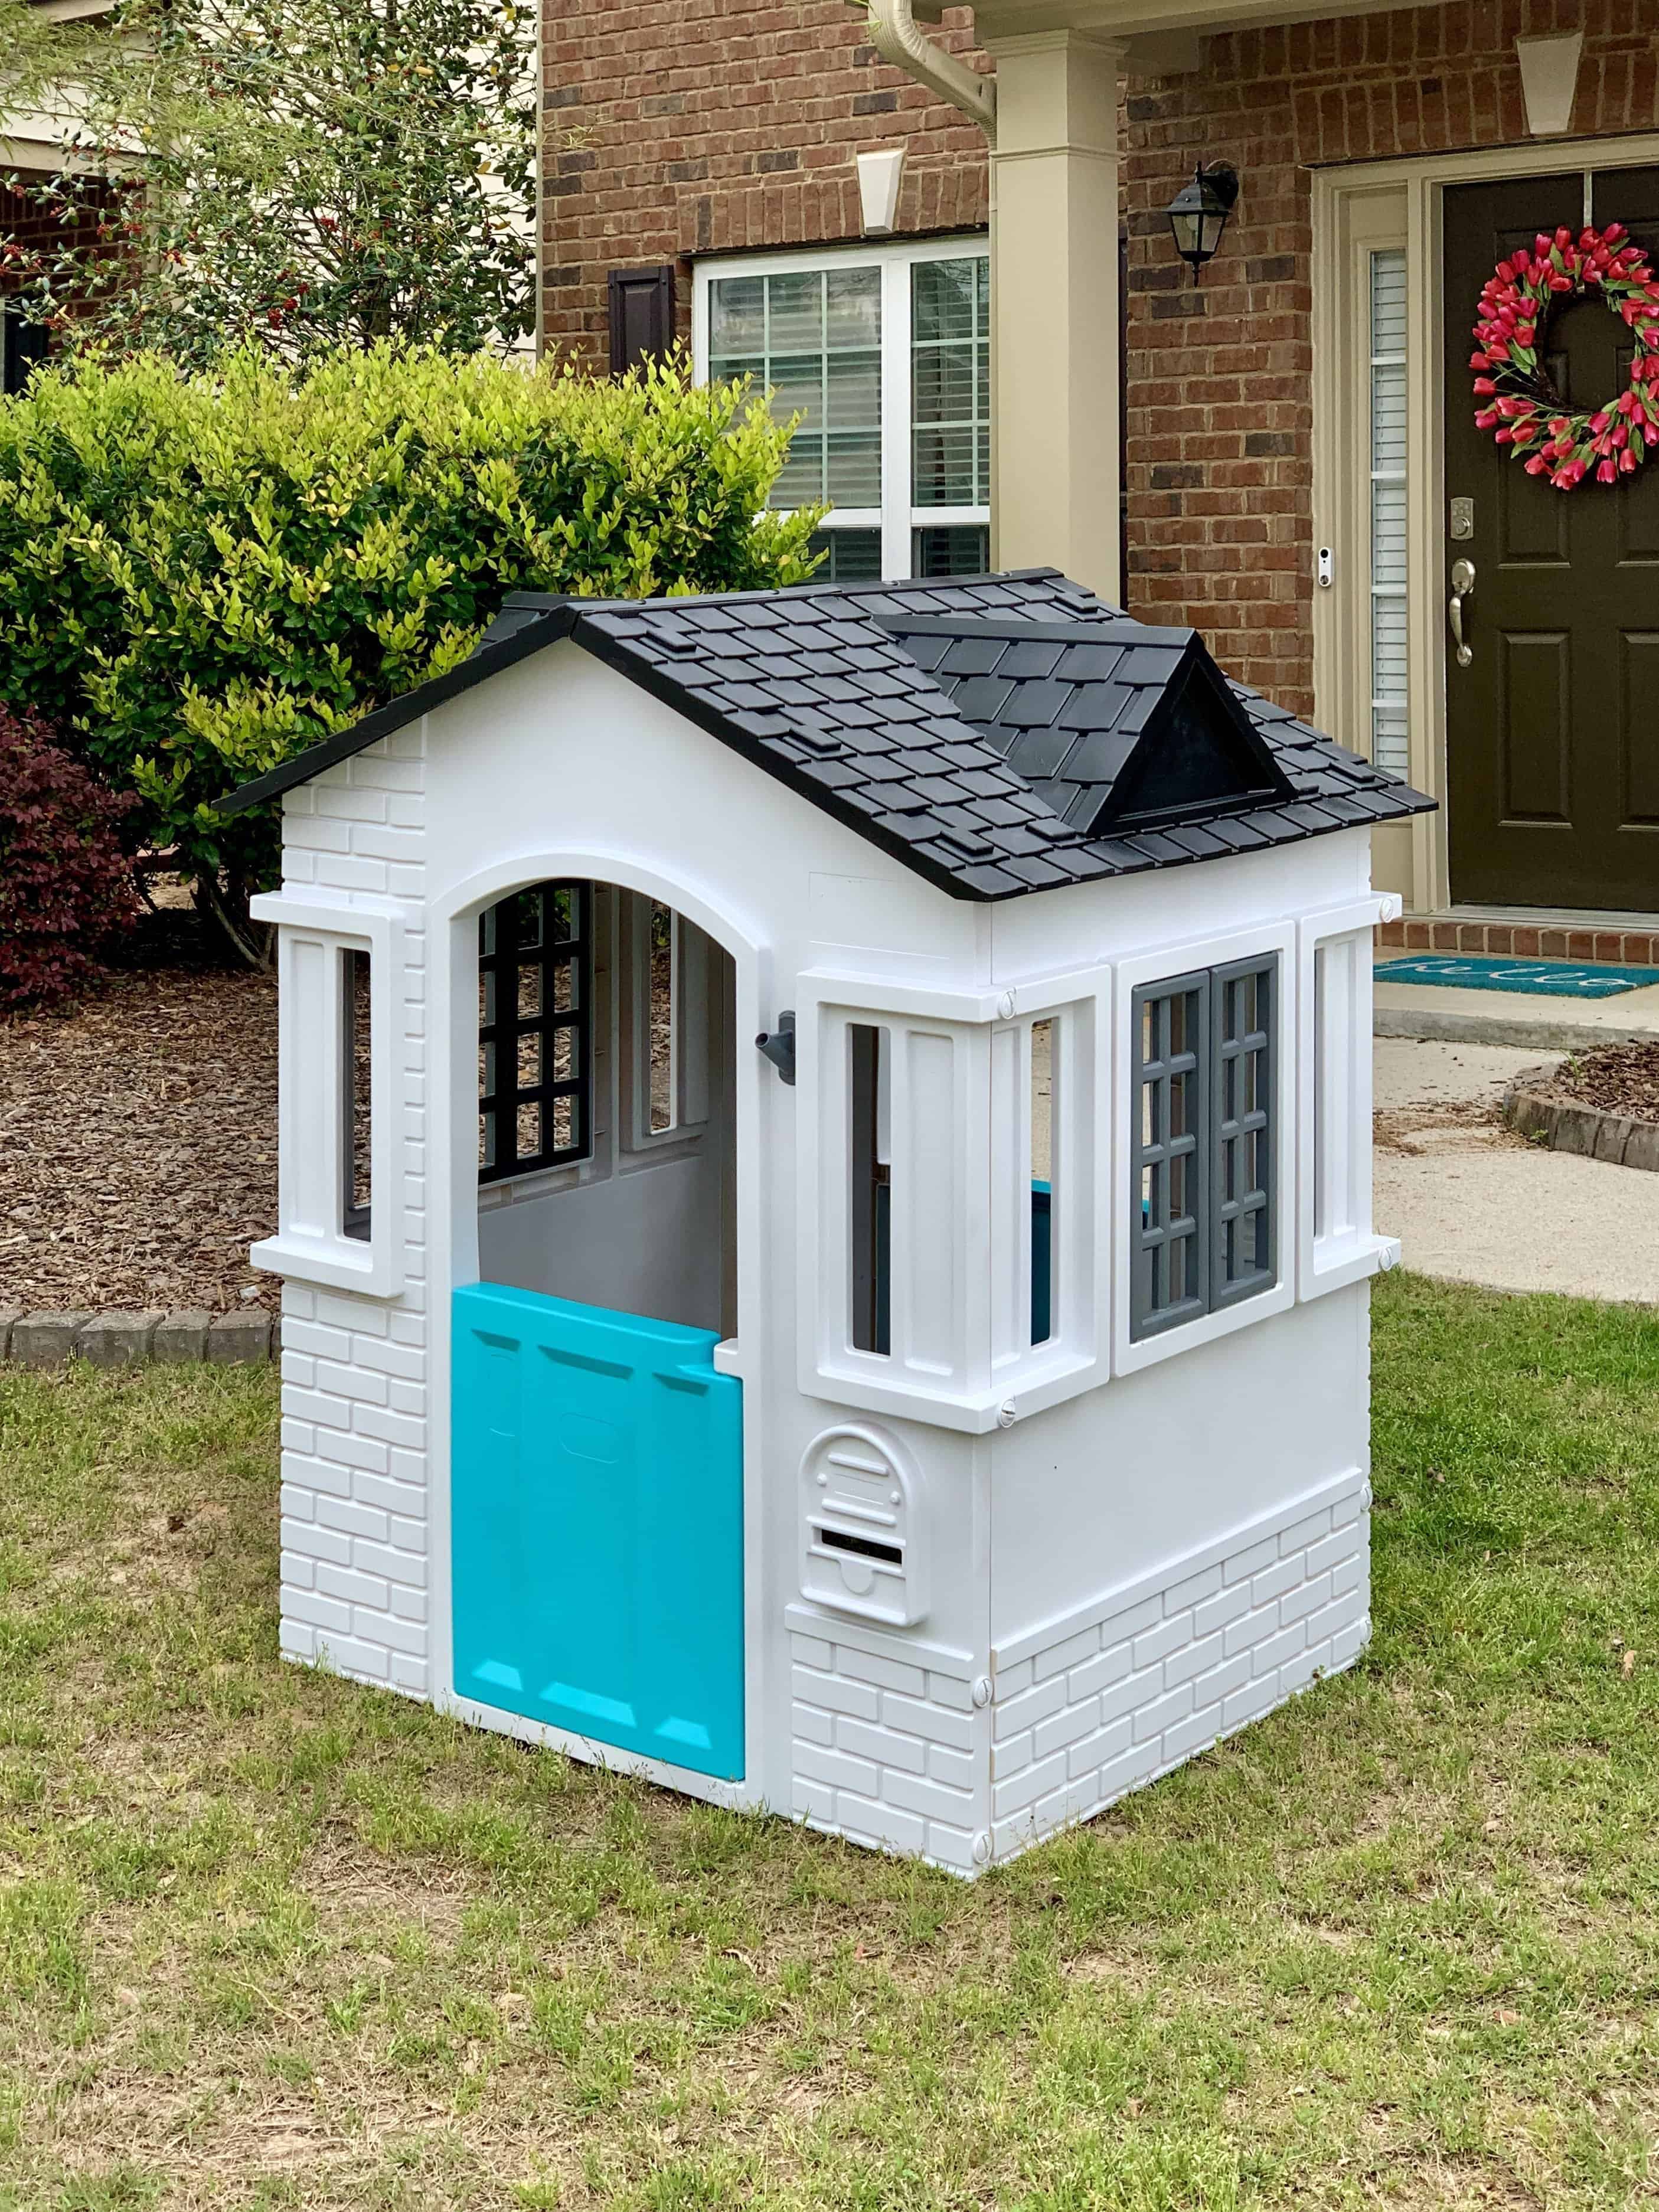
Check out the before and after pictures below!

Note: Some links may be affiliate links. That means I may make a commission if you use my links to purchase, at no extra added cost to you! I only recommend products that I personally love and believe in. Full disclaimer here.
Why Try a DIY Plastic Playhouse Makeover?
- Affordable upgrade: You can turn a faded, old plastic playhouse into a gorgeous “new playhouse” with less than $100 in supplies.
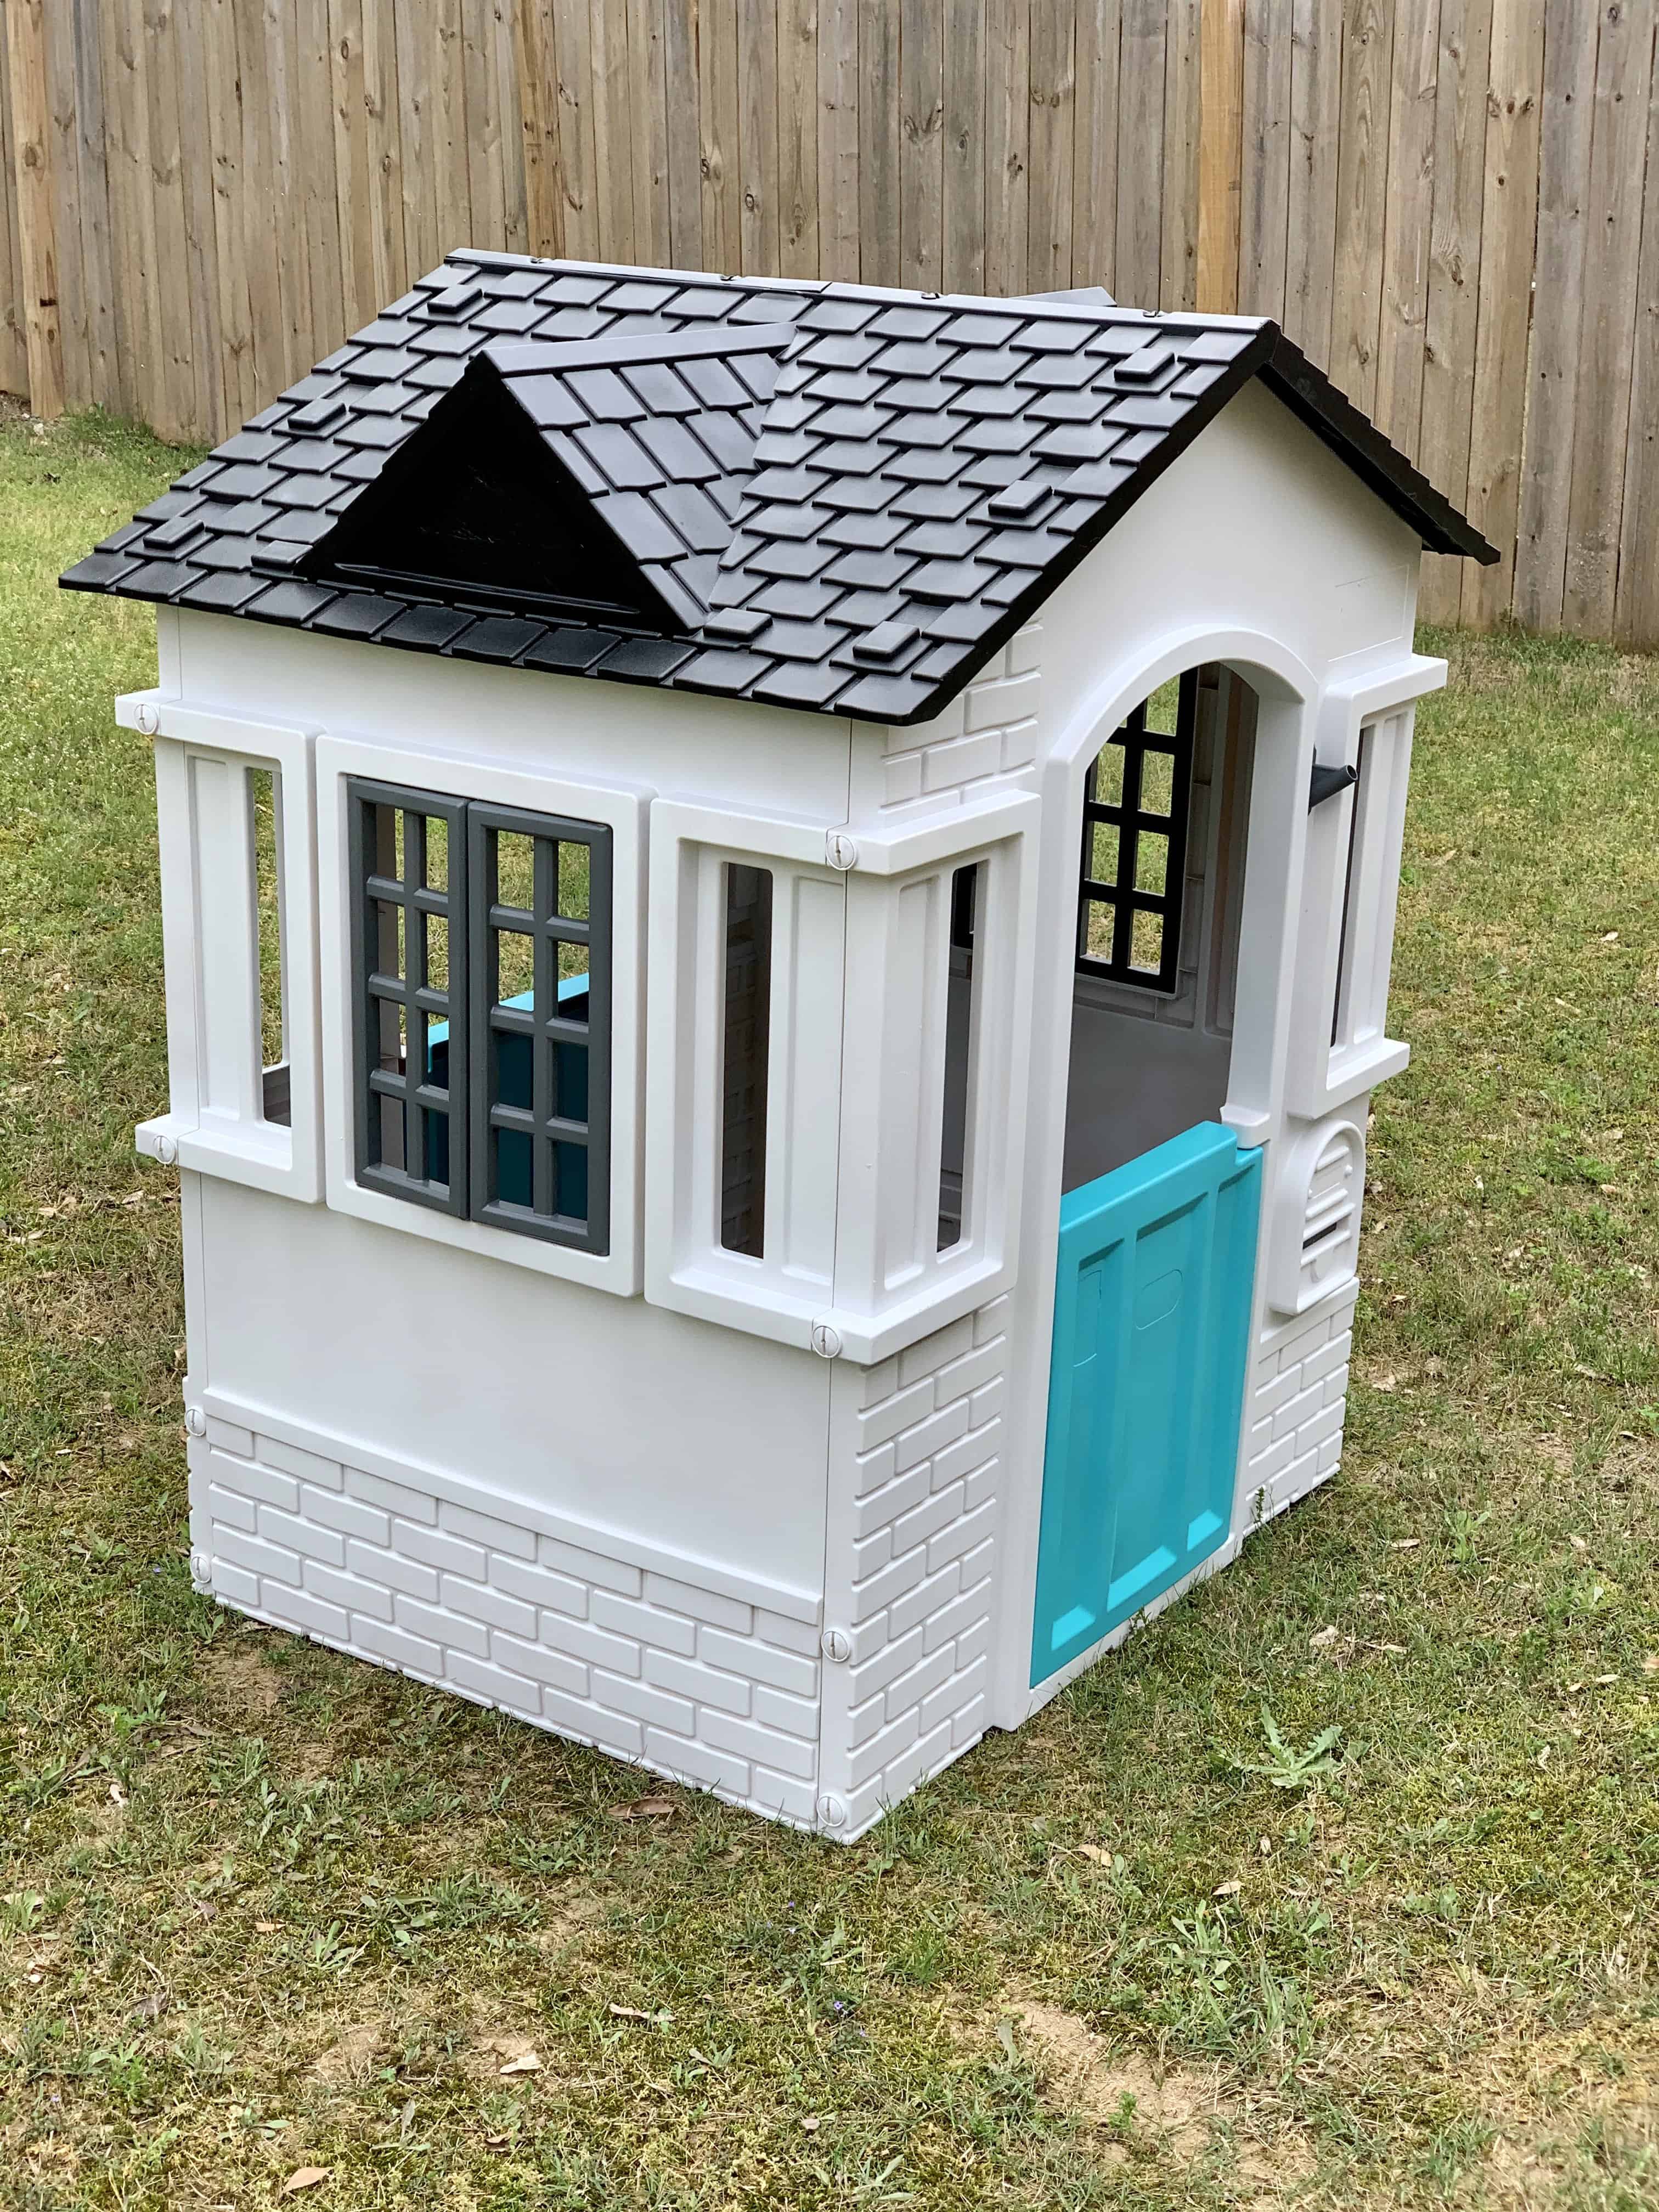
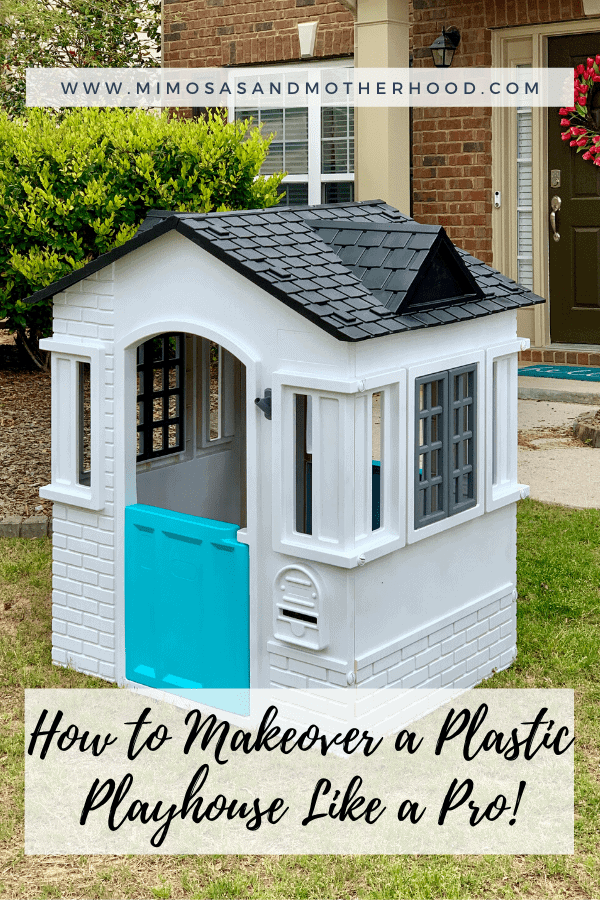
- Customizable: Choose any color scheme—neutral, farmhouse, or bright and bold. I used a white body, a charcoal roof, gray shutters, and a bright blue door.
- Eco-friendly: Instead of buying brand new, you can upcycle second-hand playhouses for a fraction of the cost.
- Fun project: This is a great weekend DIY with a big before-and-after payoff. Plus, you can use the technique to make over all kinds of plastic kids toys, like this DIY Cozy Coupe Makeover.
Supplies You’ll Need to Paint a Plastic Playhouse
Before you start your playhouse makeover, gather everything you’ll need. Most can be found at Home Depot, Amazon, or even Dollar Tree for small extras like cleaning supplies.
I’ve linked all of my supplies below on Amazon and Home Depot depending on what’s easier for you! Home Depot will let you easily do in-store pickup of all of these items in just a few hours if you don’t want to wait on shipping.
- Spray primer (plastic-friendly) – at least 1 can for doors and slick areas; add more if you plan to prime the whole house
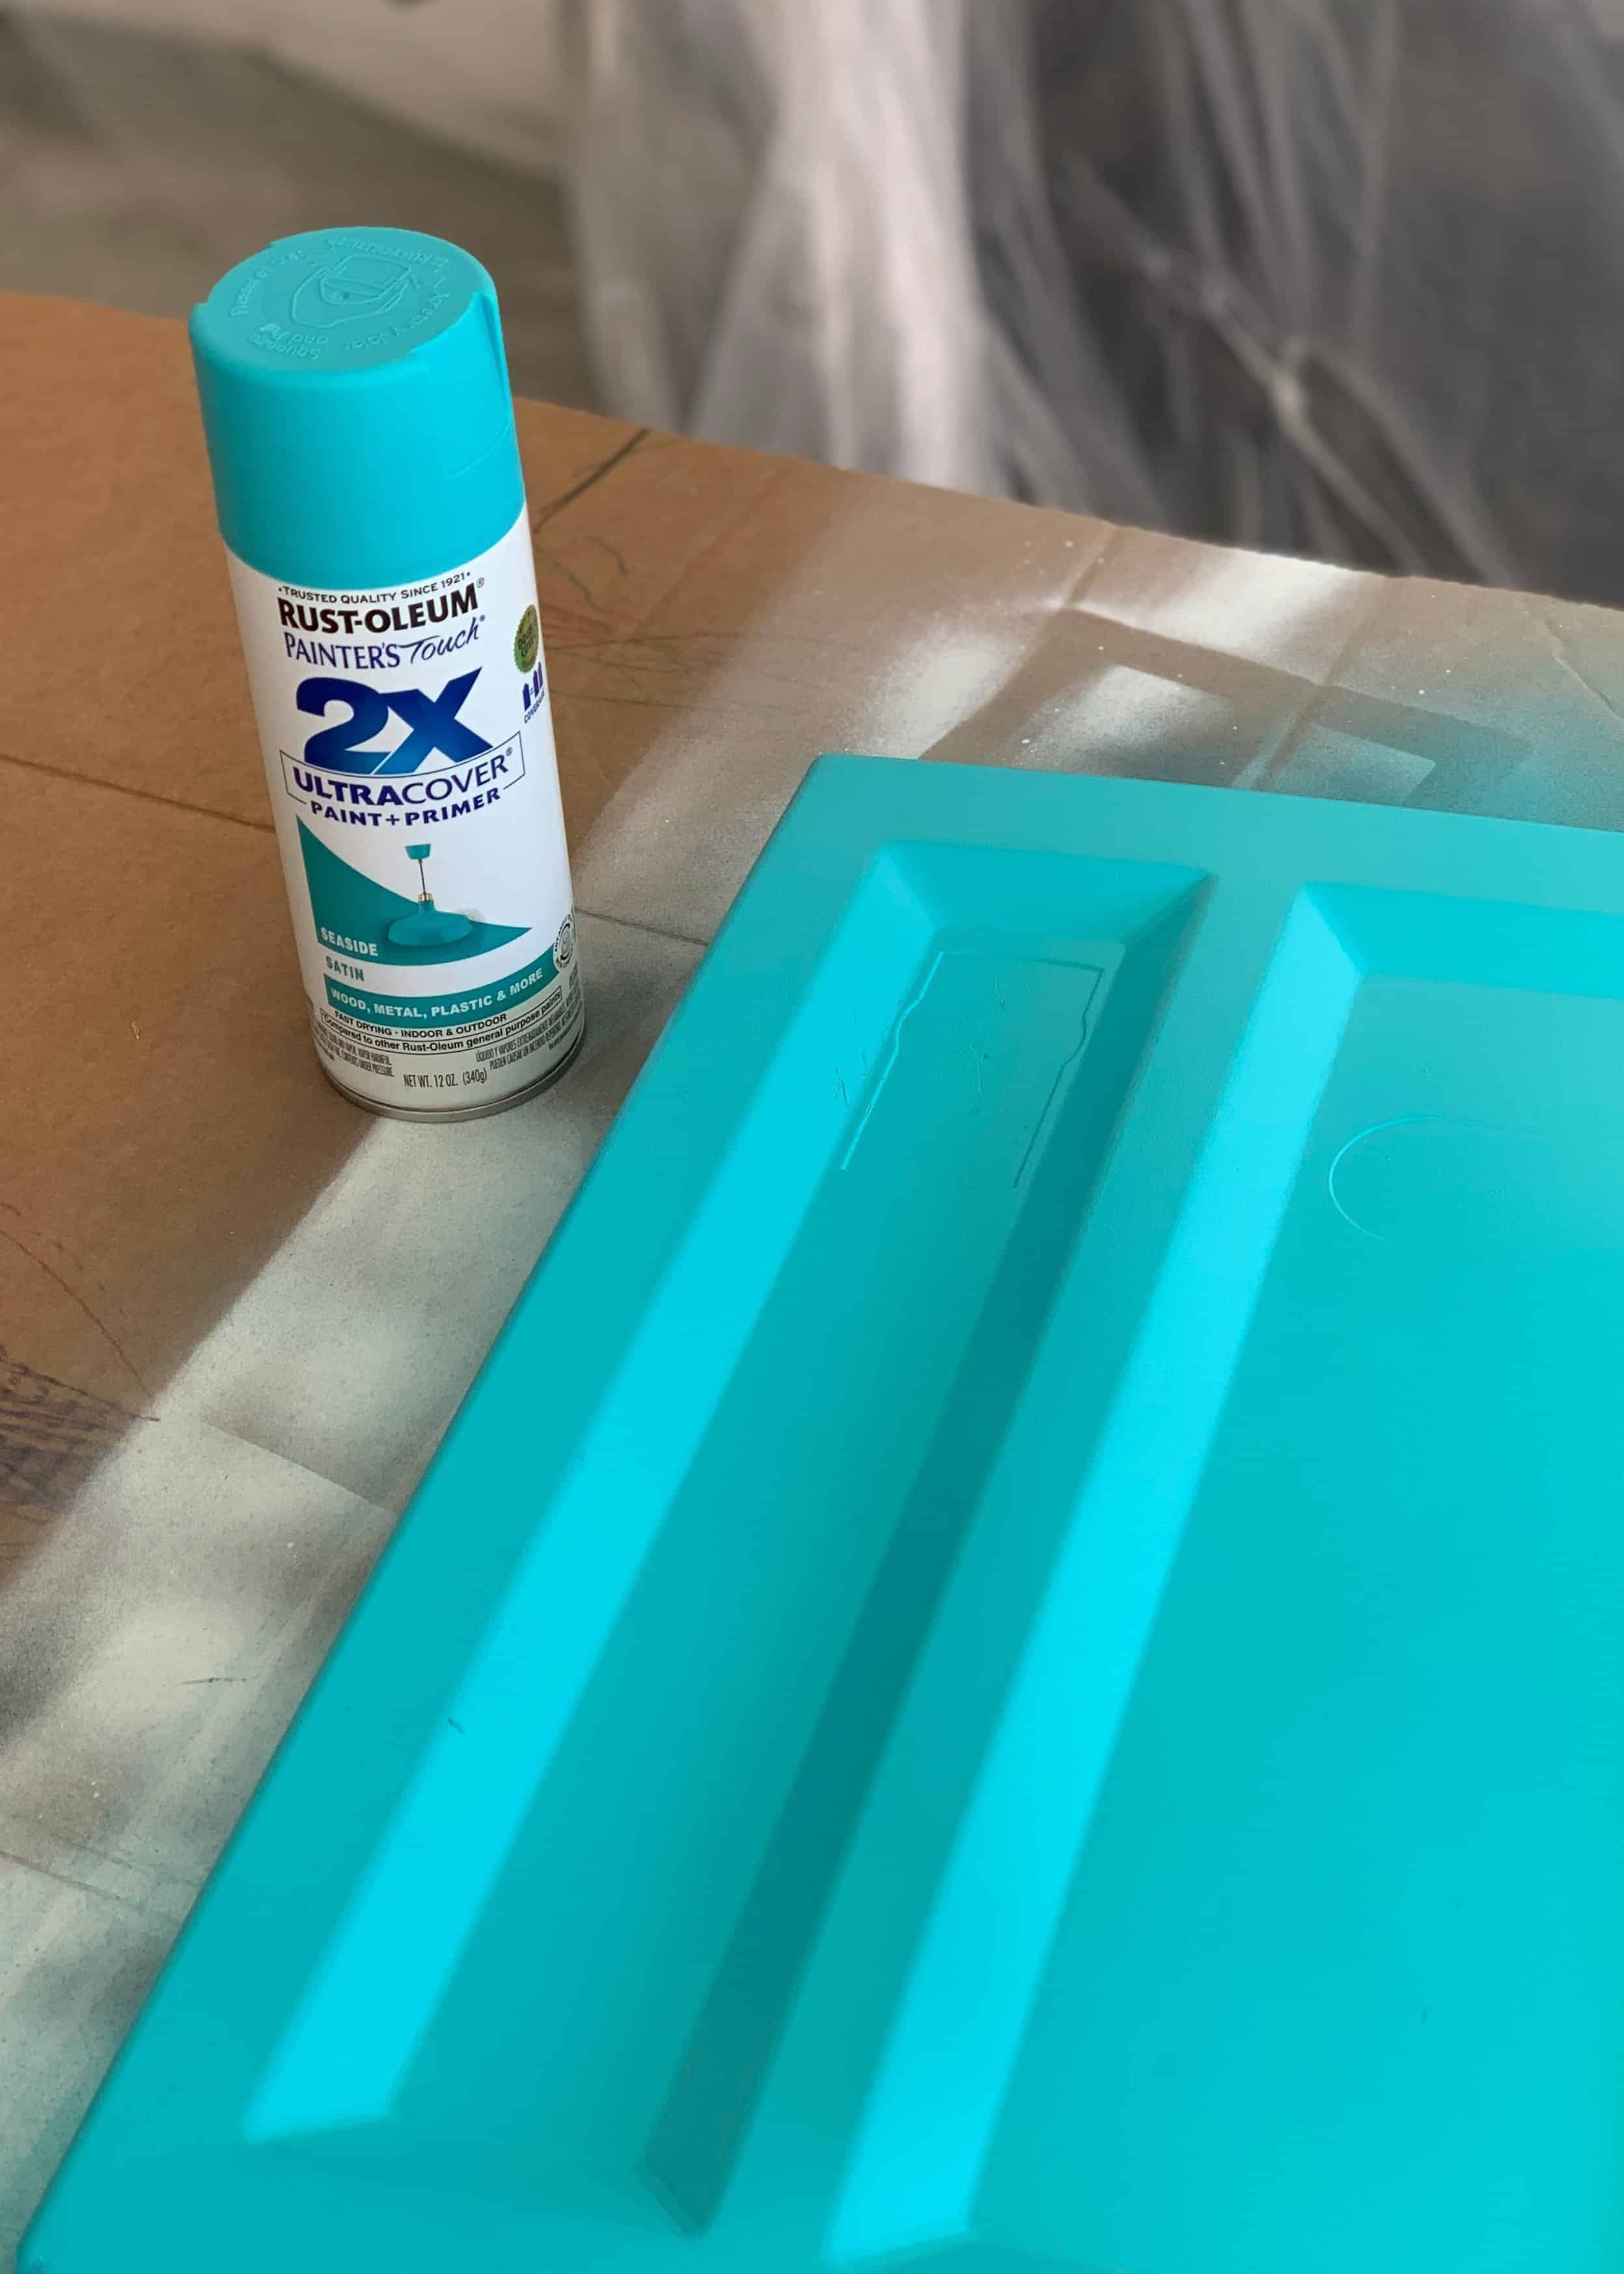
- Plastic-friendly spray paint (Rustoleum’s Painter’s Touch 2X line works best)
- Body: 3 cans of paint
- Roof: 2 cans
- Door: 1 can
- Shutters: 1 can
- Spray sealer – at least 2 cans (add extra coats of sealant for doors and high-touch areas)
- Canvas drop cloth or plastic tarp for painting (avoid thin plastic drop cloths, which can stick to painted surfaces)
- Warm water, Goo Gone, or a power washer for cleaning
- Painter’s tape (optional for outdoor lights, flag poles, or detailed trim)
Recommended Spray Paint Colors for This Project
While you can paint your playhouse literally any color you want, below are the shades of paint I used if you want to recreate the same color scheme:
- Black Roof: Canyon Black
- Gray Shutters: Dark Gray
- Blue Doors: Seaside
- White Interior/Exterior: White
Note: it doesn’t really matter what finish or sheen you use. Totally personal preference!
Home Depot: Links to find the primer, white spray paint, gray spray paint, black spray paint, blue spray paint, spray sealer, drop cloth
Amazon: Links to find the primer, white spray paint, gray spray paint, black spray paint, blue spray paint, spray sealer, drop cloth
Step-by-Step Guide to a DIY Plastic Playhouse Makeover
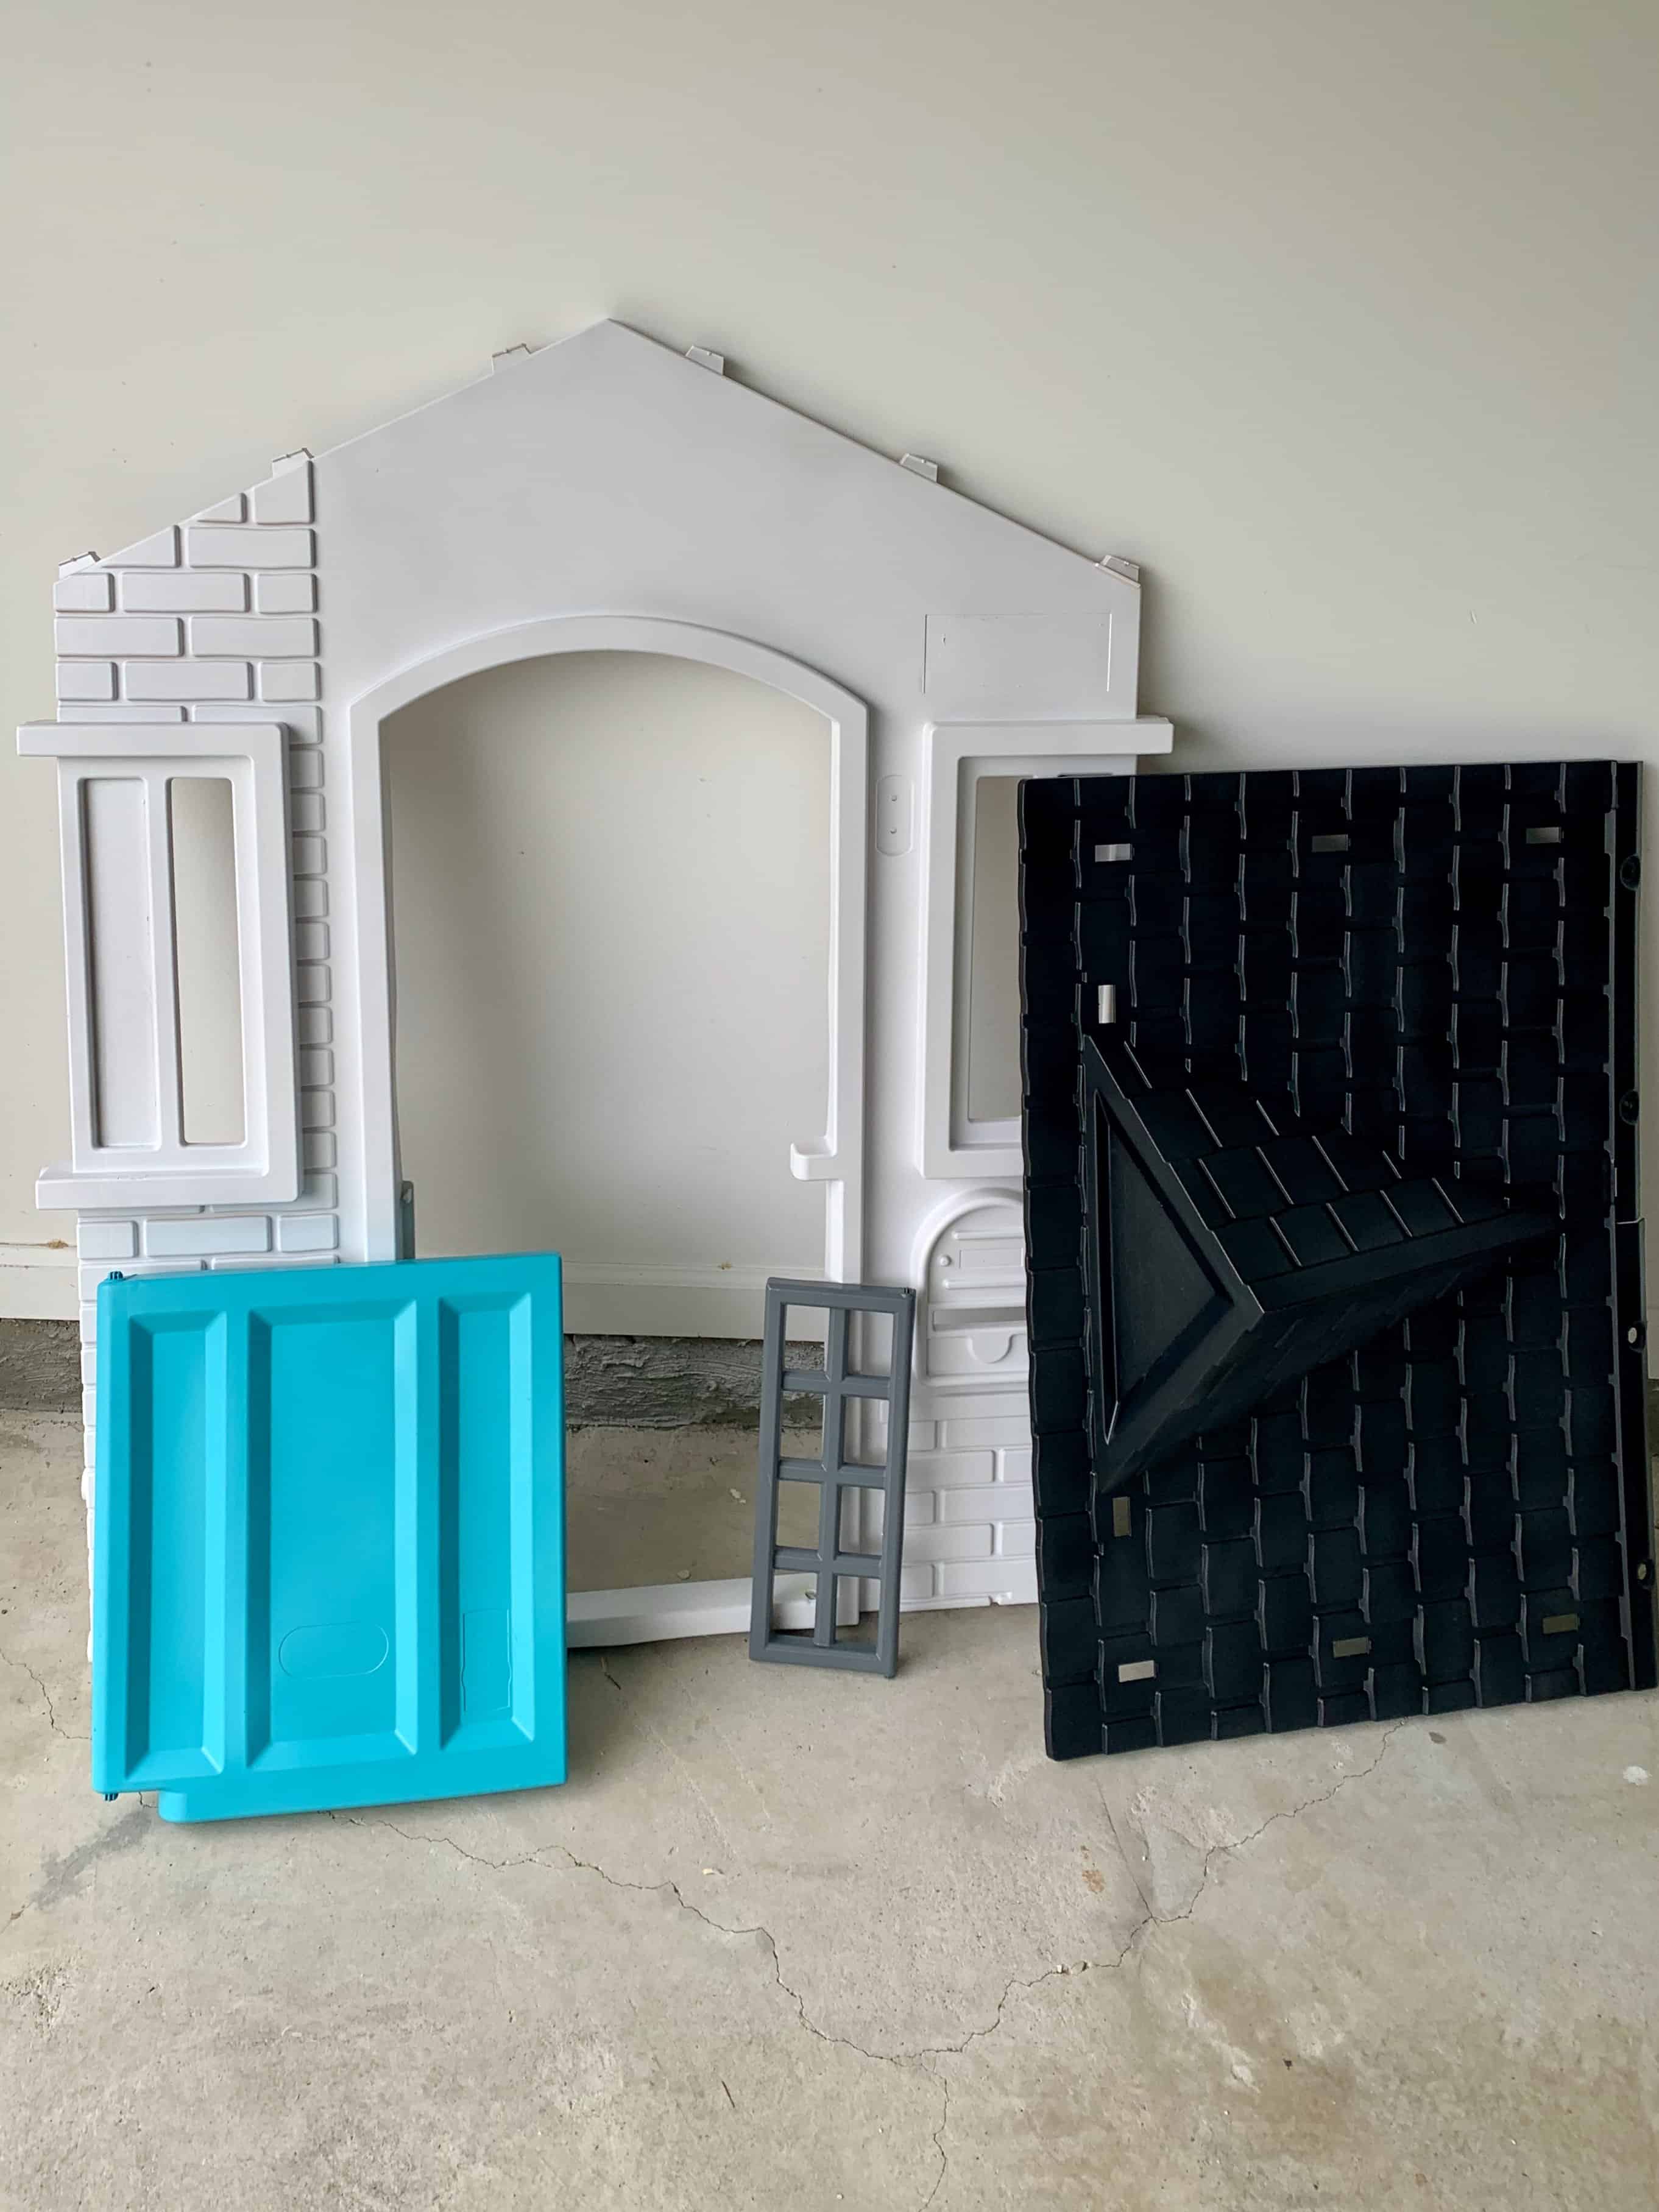
Step 1: Take the Playhouse Apart
The first step is disassembling your piece of the playhouse into sections. Remove the door handle, shutters, and sides of the door. This makes it easier to apply even coats of paint and prevents tape from peeling off fresh paint later.
Step 2: Deep Clean the Playhouse
Clean every part thoroughly, inside AND outside. I used warm water with soap and added Goo Gone on sticky spots.
A power washer is also an easy fix if your playhouse has been outside for years. Let it dry completely—ideally a full 24 hours of dry time—before moving on.
Step 3: Prime the Surfaces
Certain plastic materials (like the doors) are slick and need extra help for paint to stick. Apply at least two coats of primer to these spots.
For the whole house, one first coat of primer is usually enough. Always follow the can’s directions and allow proper dry time between coats. Be sure to prime the entire surface for best results.
Step 4: Spray Paint the Playhouse
Now comes the fun part—paint! Choose a color scheme that matches your backyard or your child’s personality. Apply at least two coats of paint on every surface for the best work.
Remember:
- Start with the back sides of pieces in case they stick to your tarp.
- Spray in a well-lit area (I learned the hard way that painting in the hot sun or near dusk leads to missed spots).
- Avoid plastic drop cloths—use cardboard or a canvas tarp instead (also learned this one the hard way)
Need some inspiration? Popular color schemes include:
- Farmhouse chic: White paint body, black or charcoal roof, gray shutters.
- Bright & playful: Blue doors, yellow trim, green shutters.
- Neutral modern: Beige body, dark brown roof, slate shutters.
Step 5: Apply Sealer
After at least 24 hours of dry time, spray the entire house with two coats of sealant. High-touch areas like the sides of the door or door handle may need 3–4 coats for durability. This extra step ensures your makeover lasts through rain, sun, and heavy play.
Step 6: Reassemble and Add Finishing Touches
Once fully dry, reassemble your model playhouse. Add outdoor lights (Dollar Tree has cute solar options), a mini welcome mat, or even potted flowers for a Pinterest-worthy finish.
Tips & Tricks for the Best Plastic Playhouse Makeovers
- Read the can’s directions carefully—paint formulas vary. Be sure that your spray paint is made for plastic.
- Don’t rush coats. A couple hours of dry time isn’t enough; let each coat of paint cure properly.
- If you’re painting in extreme weather, bring pieces into a garage or shaded area.
- Use acrylic paints and a brush for small details or accents.
- If you mess up? No worries. Just add another coat of paint—it’s an easy fix.
Final Thoughts on Creating Your Own DIY Plastic Playhouse Makeover
This DIY plastic playhouse makeover is a perfect way to turn an old plastic playhouse into something magical. With just a coat of paint, a few hours of dry time, and a little creativity, you can give your kids a custom new playhouse they’ll treasure.
My boys love their upcycled Little Tikes playhouse, and I love that I gave new life to something instead of buying brand new. Whether you go bold, neutral, or whimsical, these playhouse makeovers prove that with some fresh paint and coats of sealant, the possibilities are endless.
Made over your own playhouse? Tag me today! I love seeing your projects!
Mention @simply.siobhan or tag #MimosasAndMotherhood!


Ok this is amazing. I had never thought of doing this before, but we were just offered an old one from our neighbors. Does it hold up pretty well after painting?
Hi Sarah! I can tell you that after more than 4 months of being outside in our backyard, it still looks fantastic! The only area that has needed touch up is the door, which I expected anyway and is so easy to touch up.
What a great idea. And like who hasn’t had some kind of plastic structure in their yard – whether they are a parent or grandparent. But you have me looking at mine right now and trying to imagine what fun I could do with this. Like the fact that there is a sealant as well. Thanks for your post.
Hi Beth! I’m so glad you enjoyed it. I’ve been trying to find creative ways to breathe new life into “old” toys to help teach our boys the value of fixing and upcycling (and not just throwing out). This was such a fun and easy project!
Wow, looks awesome! I’m sharing this with my neighbor!
That’s awesome to hear! It’s such an easy project to customize with different colors and decor. It’s amazing how easily you can paint a plastic playhouse and make it into something new!
Wow that looks great! Love your color choices. I didn’t even realize there was plastic paint.
That you so much Debbie! It turned out really great.
Cute! My kids had to just play with dirt! 😂🤣😂
Haha! My toddler actually loves that the inside of this house is full of dirt and mud, and is “his house” to be messy in 😉
Oh my gosh how cute is this! Our playhouse is so beat up. I love the idea of repainting it! I didn’t think you could even do that with plastic. So cool! And does the sealer hold up if it gets wet in the rain or sprinklers?
It’s been in our backyard, exposed to the elements for nearly 6 months, and it still looks great! That’s one of the reasons I recommend the two coats of sealer.
Well built toys can definitely be used for multiple kids. Sometimes all they need is a revamp. Yours looks amazing.
Thank you so much for the kind words.
Quite the facelift! It turned out awesome. It is great to repurpose something that still has so much life left in it. Great work!
It’s so much fun to breathe new life into something like this!
What a great idea! It turned out beautifully!
Looks great! I remember when my yard was decorated in plastic!! Lol! We had a playhouse very similar to that… and it definitely could have used a makeover after going through 4 kids!
I really enjoy DIY projects, and my grandson is about to turn 2 so he’d love a playhouse like this. I was so interested to read about the types of paint – I didn’t know there was one for plastic.
Yes! There are different types of paint for nearly every surface, and it’s so important to choose the right one so that your project holds up.
Cute project!
This is a great idea! I hadn’t thought to paint over something like this. It looks like new again!!
What a great project! Nice job!
I had no problem with the roof or doors in coverage or quantity, but the body I’ve already used 3xans on just painting one side. I even used one of those devices to help with spray fatigue. Any advice? I estimate it will take me 2-3 cans more to complete. Also, do you have tu o use a sealer if it’s going to be used indoors only?
Hi Kenzie!
Are you sure you’re applying just a light coat of the spray paint each time? It sounds like you might be putting too much on. The spray paint amounts I gave in the tutorial are the actual amounts that we used. And you don’t have to use a sealer if it’s indoors early, BUT I still recommend it because most likely your kids are as rough as mine, and the sealer helps the paint from chipping!
My playhouse is painted and drying but I was curious did you assemble them seal or do sealer let dry 24 hrs flip over and then do sealer again dry for 24 hrs and then assemble?? I love your playhouse!!!
Hi Beth! I let dry for 24 hours before assembling. There are a couple spots on the playhouse that rub together when you’re assembling it, so I wanted to be sure the sealer was totally dry. So glad you love the tutorial! =)
Question! Did you remove the stickers or paint over them? I cannot get these darn stickers off! Love this idea!
Hi Erica! We scraped them off. Try spraying a good cleaner on top and letting it soak in for the hardest to remove ones. Then use either a razor blade or a paint scraper!